Donchian Breakout AI Adaptive Trend
DESCRIPTION:
A self-adapting trend-following indicator that uses K-Means machine learning to analyze 27 Donchian Channel parameter combinations in real-time, identifying which breakout settings perform best in the current market regime.
━━━━━━━━━━━━━━━━━━━
🔍 HOW IT WORKS
The core logic is based on the Donchian Channel breakout — the original trend-following system used by the legendary Turtle Traders. Price breaking above the highest high signals a long, breaking below the lowest low signals a short.
The AI layer runs 27 parameter combinations simultaneously in the background:
• Entry lookback: 10, 20, 30 bars
• Exit lookback: 5, 10, 15 bars
• ATR filter: 1.0x, 1.5x, 2.0x
Each combination is tracked for real-time performance. K-Means clustering (an unsupervised machine learning algorithm) groups these into Best, Average, and Worst performing clusters — and the dashboard tells you what's working best right now.
━━━━━━━━━━━━━━━━━━━
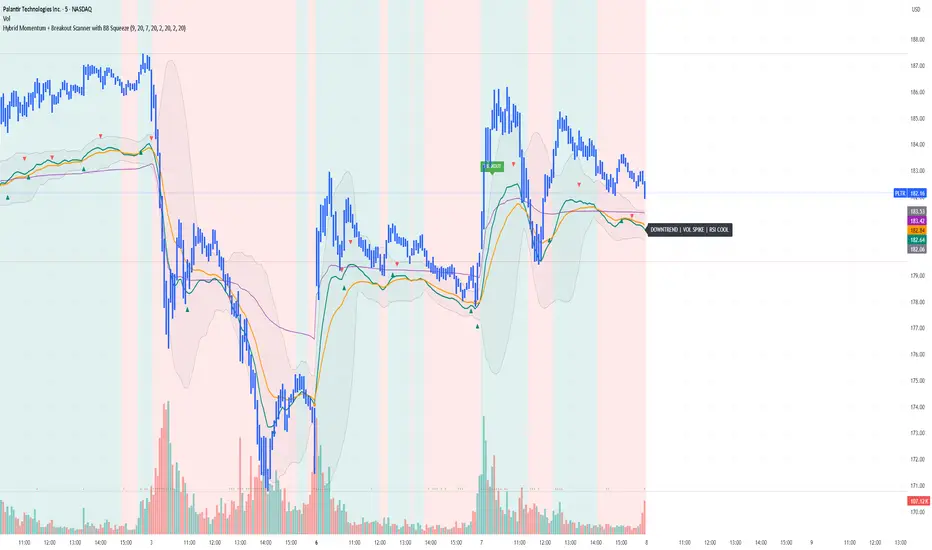
★ HOW TO READ SIGNALS
Signals use a visual agreement system between the base strategy and the AI:
★ Bright + Large label = AI-confirmed signal (confidence ≥ threshold)
○ Dim + Small label = Signal fired but AI confidence is low
The number on each label is the AI confidence score (0-10). Higher = stronger agreement from the AI. You decide: trade all signals, or only the bright AI-confirmed ones.
Entry: Price breaks above the Donchian high (long) or below the Donchian low (short)
Exit: Price breaks the exit channel in the opposite direction, OR the ATR trailing stop is hit (orange step-line on chart)
Trend Filter: EMA(50) prevents counter-trend entries — longs only when price is above the EMA, shorts only when below. The EMA is plotted on chart (green = bullish, red = bearish).
━━━━━━━━━━━━━━━━━━━
📊 HOW TO READ THE DASHBOARD
Signal — Current position state:
★ LONG / ★ SHORT = AI-confirmed trade active
○ LONG / ○ SHORT = Trade active but AI confidence is low (⚠ CAUTION)
— WAITING = No trade, scanning for next breakout
Confidence — Only shown during active trades. A 5-factor composite score:
STRONG (8-10) / HIGH (6-7) / MODERATE (4-5) / LOW (2-3) / WEAK (0-1)
Visual bar: ■■■■■■■□□□ shows the score at a glance
Shows "—" when waiting (no signal to score)
Regime — Current volatility environment based on 20-bar annualized volatility:
LOW VOL = Quiet, fewer breakouts expected
NORMAL = Healthy trending conditions
HIGH VOL = Elevated volatility, wider moves
⚠ EXTREME = Crash/mania conditions
AI Next Entry — The entry lookback (in bars) that the best-performing cluster recommends for the next trade. Example: "20-bar breakout" means the AI thinks 20-bar Donchian highs/lows are optimal right now.
AI Next Exit — The exit lookback the best cluster recommends. Shorter = tighter exits (locks profit faster). Longer = gives trades more room to run.
AI Next Filter — The ATR filter multiplier the best cluster recommends. Higher = only trades strong breakouts. Lower = catches more breakouts including weaker ones.
Best WR — Win rate of the best-performing cluster's simulated trades. Trend-following typically runs 35-50% win rate with large winners compensating for small losses.
Clusters — Distribution of the 27 parameter combos across Best ● Average ● Worst groups. When most combos cluster into "Best," conditions are broadly favorable.
Trend(50) — EMA trend filter direction:
▲ BULLISH / longs only = Price above EMA, only long breakouts allowed
▼ BEARISH / shorts only = Price below EMA, only short breakdowns allowed
━━━━━━━━━━━━━━━━━━━
⚙️ KEY FEATURES
• Non-repainting — All signals use previous-bar confirmed data. Trailing stop updates on bar close only. No signal will appear mid-bar then vanish.
• ATR trailing stop — Locks in profits during extended trends, plotted as orange step-line on chart
• Trend filter — EMA(50) blocks counter-trend entries, preventing long signals during crashes
• ATR breakout filter — Removes weak/noisy breakouts that don't move enough
• Bright/dim visual system — Instantly see which signals the AI agrees with
• 7 alert conditions — Including AI-confirmed entries for selective trading
• Rich tooltips — Hover any signal label for full breakdown (breakout level, confidence, ATR, AI optimal params, cluster win rate)
━━━━━━━━━━━━━━━━━━━
📐 RECOMMENDED SETTINGS
Crypto (BTC, ETH) — 4H or Daily, default settings
Forex — 4H, ATR filter 1.0x for tighter moves
Commodities (Gold, Oil) — Daily, ATR trail 2.5x
Indices (SPY, NAS100) — Daily, trend MA 100
AI Confidence Threshold: Default 5. Raise to 6-7 for fewer but higher-conviction signals. Lower to 3-4 to see more signals.
━━━━━━━━━━━━━━━━━━━
🎓 THE AI EXPLAINED
The "AI" is K-Means clustering — a real unsupervised machine learning algorithm. Here's exactly what it does:
1. Simulates 27 Donchian strategies with different parameters every bar
2. Tracks each one's performance using an EMA-smoothed return metric
3. K-Means groups them into 3 clusters based on performance similarity
4. The best cluster's average parameters become the "AI Next" recommendation
5. Confidence is a 5-factor composite: cluster spread, win rate, breakout strength, trend alignment, and volatility expansion
This means the indicator constantly adapts. In choppy markets, longer lookbacks with stricter filters dominate the best cluster. In trending markets, shorter aggressive breakouts take over. You see this shift in real-time on the dashboard.
━━━━━━━━━━━━━━━━━━━
⚠️ DISCLAIMER
This indicator is a tool for analysis, not financial advice. Past performance does not guarantee future results. Always use proper risk management and position sizing.
━━━━━━━━━━━━━━━━━━━
Happy trading.
Indicador Pine Script®