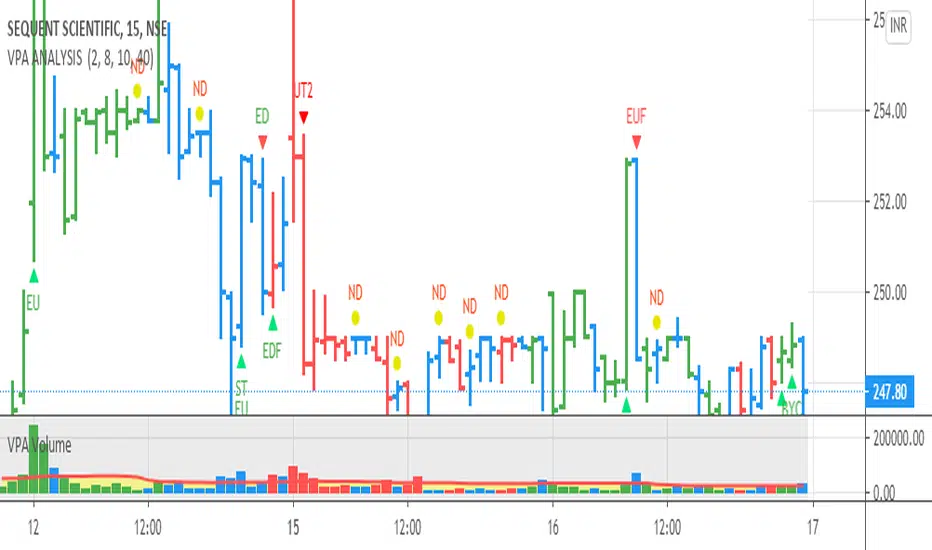
Ichimoku Kinko Hyo: Basic StrategyIchimoku Kinko Hyo: Basic Strategy
Entry/Exit orders are placed when three basic signals are triggered.
Ichimoku Signals:
1) Tenkan-Sen/Kijun-Sen Cross
Bullish: Tenkan-Sen is above the Kijun-Sen.
Bearish: Tenkan-Sen is below the Kijun-Sen.
2) Chikou-Span Cross
Bullish: Chikou-Span is above the close of 26 bars ago.
Bearish: Chikou-Span is below the close of 26 bars ago.
3) Price versus Kumo Cloud
Bullish: Close is above the Kumo Cloud.
Bearish: Close is below the Kumo Cloud.
Notes:
1) Long-only or short-only direction is feasible by checkbox. Stop and reverse strategy is taken by default.
2) Built-in Ichimoku indicator is strictly wrong because of counting one extra bar for all Ichimoku components.
Including the current bar like moving average is correct way in Japan. This problem is fixed in my script.
Buscar en scripts para "bear"
HTB Reversal Pattern - RSI DivergenceHow this Script Works
Pivot Points: The script looks for "peaks" and "valleys" in the RSI indicator.
Divergence Logic: * Bullish: If the current price low is lower than the previous low, but the RSI low is higher than the previous RSI low, it indicates the selling pressure is fading despite the price drop.
Bearish: If the current price high is higher than the previous high, but the RSI high is lower than the previous RSI high, it suggests buying momentum is weakening.
The "Lookback" Offset: Because pivot points require a few bars to the right to be confirmed (defined by lbR), the labels will appear on the chart with a small delay (default is 5 bars). This is necessary to prevent "repainting" (signals that disappear after they appear).
Liquidity Zones | NRP | ProjectSyndicate🏦 ProjectSyndicate Liquidity Zones 1.0 — Complete Documentation
Specifically built for: XAUUSD (Gold) 🥇, NQ 💻, ES 📈 and FX 💱 traders
✅Default settings: tuned to work well across multiple timeframes
Best sweet spot timeframes : M5 / M15 / M30 / H1 → consistently produces high-quality zones
________________________________________
🌍 Overview
ProjectSyndicate Liquidity Zones is a Pine Script v6 indicator built to identify stop-loss hunting zones and liquidity pockets—areas where price frequently sweeps retail stops and then reverses.
It automatically detects and draws zones where institutional flow often triggers liquidity before moving price in the opposite direction.
________________________________________
💧 What Are Liquidity Zones?
Liquidity zones are price levels where stop-loss orders cluster (often around swing highs/lows). Large players may push price into these levels to trigger stops (liquidity sweep) and then reverse.
Also known as:
• 🪤 Stop-loss hunting
• 🌊 Liquidity sweeps
• 🎯 Stop runs
________________________________________
🥇 Why Gold, NQ, ES & FX?
These markets often show repeatable liquidity behavior because of:
• 👥 Heavy participation and predictable stop placement
• 🏛️ Strong institutional activity and order flow
• ⚡ Volatility that enables fast “sweep & reverse” moves
• 📍 Clear technical levels where stops tend to cluster
________________________________________
⚙️ How It Works (3 Detection Engines)
1) 🔺 Pivot-Based Detection
Finds swing highs/lows using fractal pivots—natural stop placement zones.
2) 🕯️ Wick Trap Detection
Flags candles with dominant wicks (long rejection shadows), suggesting stops were hit then price snapped back.
3) 📊 Volume Spike Detection
Marks extremes where volume is elevated (local highs/lows). High volume at extremes often signals liquidity being triggered.
________________________________________
🧩 Zone Types
🟦 Bull Liquidity Zones (Teal/Cyan)
• 📍 Below current price (support area)
• 🧠 Indicates buy-side stops were swept (longs got hunted)
• 📈 Often becomes a potential reversal zone upward
• ✅ Idea: Look for bullish confirmation after a sweep
🟥 Bear Liquidity Zones (Maroon/Red)
• 📍 Above current price (resistance area)
• 🧠 Indicates sell-side stops were swept (shorts got hunted)
• 📉 Often becomes a potential reversal zone downward
• ✅ Idea: Look for bearish confirmation after a sweep
⚪ Historic Zones (Gray)
• 🕰️ Zones that were breached
• 📚 Useful for studying past behavior and sweep patterns
• ❗ Not considered “active”, but great for context
________________________________________
🛠️ Settings Guide
🔎 Detection Settings
🔺 Pivot Detection Length (Default: 10)
• Range: 3 → 50
• Controls swing sensitivity
• Lower (5–8): more zones, faster, noisier ⚡
• Higher (15–20): fewer zones, stronger, cleaner ✅
Recommended (XAUUSD / NQ / ES / FX):
• ⏱️ M5 / M15: 8–10
• ⏱️ M30: 10–12
• ⏱️ H1: 12–15
🕯️ Wick Dominance Ratio (Default: 0.5)
• Range: 0.3 → 0.85
• 0.5 = wick must be ≥ 50% of candle range
• Lower: more traps detected
• Higher: only extreme rejections
✅ Recommended: 0.5–0.6 (balanced)
📊 Volume Spike Multiplier (Default: 1.3)
• Range: 1.0 → 4.0
• 1.3 = volume must be ≥ 130% of 20-period avg
• Lower: more signals
• Higher: only major spikes
✅ Recommended: 1.3–1.5
________________________________________
📦 Zone Settings
📏 Zone ATR Period (Default: 14)
• Range: 10 → 50
• Controls volatility measurement used for zone sizing
• Shorter = more responsive ⚡
• Longer = smoother ✅
✅ Recommended: 14–20
📐 Zone Width (ATR Multiple) (Default: 0.5)
• Range: 0.2 → 1.5
• 0.5 = zone extends 0.5 × ATR around the level
• Smaller (0.3–0.4) = tight & precise 🎯
• Larger (0.6–0.8) = wider coverage 🌊
✅ Recommended: 0.4–0.6
🧱 Max Zones (Default: 8)
• Range: 2 → 20
• Lower = cleaner chart 🧼
• Higher = more context 📚
✅ Recommended: 6–10
↔️ Min Zone Separation (ATR) (Default: 2.0)
• Range: 0.5 → 5.0
• Prevents zone clustering
• Lower = more zones (tighter stacking)
• Higher = fewer zones (cleaner layout)
✅ Recommended: 1.5–2.5
________________________________________
👁️ Display Options
• ✅ Show Current Zones (ON) → active bull/bear zones
• ⛔ Show Historic Zones (OFF) → breached zones in gray
• ✅ Show Zone Labels (ON) → quick identification
• ⛔ Show Pivot Markers (OFF) → optional triangles
• 🌫️ Zone Opacity (80) → suggested 75–85
• 🎨 Bull Color: Teal
• 🎨 Bear Color: Maroon
________________________________________
📈 Trading Strategies
🪤 Strategy 1: Liquidity Sweep Reversal
Steps:
1️⃣ Identify zone
2️⃣ Wait for price to sweep into zone (wick into it)
3️⃣ Confirm with rejection candle
4️⃣ Enter with stop beyond zone
✅ Example (concept): sweep → reclaim → continuation
________________________________________
🔁 Strategy 2: Zone-to-Zone Trading
• Sweep bull zone → target bear zone 🎯
• Sweep bear zone → target bull zone 🎯
Risk plan:
• 🛑 Stop: 1–2 ATR beyond zone
• 🎯 TP: next opposite zone or 2:1 RR
• 📦 Risk: 1–2% per trade
________________________________________
🧲 Strategy 3: Confluence Trading
Look for zones that align with:
• 🧮 Fibonacci (50 / 61.8)
• 🔢 Round numbers (e.g., 2600 / 2650 / 2700)
• 📅 Previous day high/low
• 📉 Trendlines / MAs
More confluence = stronger zone 💪
________________________________________
🕰️ Strategy 4: Historic Zone Analysis
Turn on historic zones and study:
• Did it reverse after breach?
• How far did it extend beyond?
• What did volume do?
Use these patterns to improve expectations on current zones 📚
________________________________________
⏱️ Timeframe Recommendations
M5
• 🏎️ Scalping, fast signals
• More zones, more noise
• Tight risk, quick exits
M15
• ⚖️ Best balance for intraday
• Strong zone quality + quantity
M30
• 🧘 Cleaner zones, stronger signals
• Wider stops, more patience
H1
• 🏗️ Highest-quality zones
• Fewer false signals, bigger targets
________________________________________
✅ Best Practices
Do’s ✅
• Wait for confirmation candles 🕯️
• Use multi-timeframe context (H1 zones + M15 entries) 🧭
• Combine with price action (engulfing / pin bars) 🎯
• Always use stops 🛑
• Study breached zones 📚
• Adapt settings to volatility 🌊
Don’ts ❌
• Don’t trade every zone blindly
• Don’t ignore context (trend/news/sentiment)
• Don’t overtrade
• Don’t treat settings as “one-size forever”
• Don’t fight strong trends without confirmation
________________________________________
🧠 Advanced Tips
🕒 Session-Based Behavior
• 🌙 Asia: zones often hold better (lower volatility)
• 🇬🇧 London: aggressive sweeps
• 🇺🇸 NY: continuations or major reversals
• 🔥 Overlaps: most volatile → strongest reactions
📰 News Awareness
High-impact events (CPI, NFP, FOMC) can:
• create zones rapidly ⚡
• invalidate zones ❗
• extend beyond zones 🎢
Tip: avoid trading zones during major releases
🧩 Multi-Timeframe Confirmation
• Find zone on H1
• Refine entry on M15
• Confirm structure shift / reaction before entry ✅
💪 Zone Strength Clues
Stronger zones often have:
• multiple detection methods (pivot + wick + volume)
• confluence with key levels
• recent formation
• clean first reaction
________________________________________
🧰 Troubleshooting
Too Many Zones
Try:
• Increase separation (2.5–3.0)
• Reduce max zones (5–6)
• Increase pivot length (12–15)
• Increase wick ratio (0.6–0.7)
Too Few Zones
Try:
• Decrease separation (1.0–1.5)
• Increase max zones (10–12)
• Reduce pivot length (7–8)
• Reduce wick ratio (0.4–0.5)
• Reduce volume multiplier (1.2)
🚫 Zones Not Showing
Check:
• “Show Current Zones” is ON ✅
• enough bars loaded
• try defaults first, then adjust
Historic Zones Not Appearing
• Price must breach zones first
• scroll back for older breaches
• increase max zones to store more
________________________________________
🔔 Indicator Alerts
🟥 Bear Liquidity Zone Detected
• Trigger: new resistance zone
• Message: “Bear liquidity hunting zone identified”
• Use: selling opportunities 🧲
🟦 Bull Liquidity Zone Detected
• Trigger: new support zone
• Message: “Bull liquidity hunting zone identified”
• Use: buying opportunities 🧲
Setup:
1️⃣ Right-click chart → Add Alert
2️⃣ Select indicator condition
3️⃣ Choose Bull/Bear alert
4️⃣ Select delivery method (popup/email/webhook)
________________________________________
⚡ Performance Notes
• 🧱 Max boxes: 500
• 🏷️ Max labels: 500
• 🪶 Lightweight / minimal lag
• ✅ No repaint (confirmed on bar close)
• 🔒 Zones stay fixed once created
________________________________________
🧾 Version History v1.0
• Pine Script v6
• 3 detection methods (pivot / wick / volume)
• Current + historic zones
• Custom colors & settings
• Built-in alerts
• Optimized defaults across M5/M15/M30/H1 for XAUUSD, NQ, ES, FX ✅
Can be also combined with Order Block Finder and FVG Finder
for complete / more advanced SMC strategy chart overlay.
✅ Order Block Finder | Gold | ProjectSyndicate
✅ FVG Finder | NRP | ProjectSyndicate
A Humbled Trader Strategy + ChecklistHumbled Trader Swing Strategy + Checklist
This indicator is a complete swing trading system based on the high-probability strategies popularized by Humbled Trader. It is designed to help traders identify trend breakouts and low-risk momentum pullbacks on the Daily Timeframe.
The script combines trend filtering, automated resistance lines, and specific entry triggers into a single chart overlay, complete with a real-time Strategy Checklist Dashboard to confirm your setups instantly.
🎯 Core Components
Trend Filter (Purple Line): The 200 Simple Moving Average (SMA). This acts as your long-term trend filter. We only look for long trades when the price is above this line.
Momentum Guide (Orange Line): The 8 Exponential Moving Average (EMA). This tracks short-term momentum. In a strong trend, price will "ride" this line. We look to enter when price pulls back to touch this area.
Multi-Month Resistance (Orange Horizontal Line): Automatically plots the highest price over the last X Months (adjustable). This helps you instantly visualize the key level the stock needs to break out from.
Checklist Dashboard: A real-time table that evaluates Trend, Resistance, and Momentum conditions to give you a clear "✅ ENTER", "🚀 GAP UP", or "⏳ WAIT" signal.
🛠 How It Works
This indicator scans for two specific setups:
1. The Daily Gap Up ("GAP" Label) This signal appears when a stock shows strong momentum by gapping up overnight.
Condition: The stock opens at least 3% higher (adjustable) than the previous day's Close AND opens above the previous day's High.
Trend: Must be above the 200 SMA.
Visual: Marked with a green "GAP" label on the chart.
2. The Trend Pullback ("ENTER" Signal) This is a trend-following entry that lets you join an existing move with lower risk.
Condition: The stock is in an uptrend but dips down to touch or test the 8 EMA.
Validation: The candle must show a "dip" (red candle or lower close) to ensure we are buying a pullback, not chasing a top.
Visual: The Dashboard "Action Signal" will turn orange and display "✅ ENTER".
📋 The Checklist Dashboard
Located in the corner of your chart, this table provides a live status report for the current bar:
Trend (> 200 SMA):
🟢 Bullish: Price is in an uptrend. Safe to look for entries.
🔴 Bearish: Price is below the 200 SMA. Stay away.
Above Resistance?:
🟢 Breakout: Price has cleared the multi-month resistance line.
⚪ ---: Price is currently below the key breakout level.
Near 8 EMA?:
🟢 Yes: Price is near the "value zone" (8 EMA) for a potential pullback entry.
Action Signal:
🚀 GAP UP: Strong momentum gap detected.
✅ ENTER: Valid pullback entry detected.
⏳ WAIT: No clear setup found.
⚙️ Settings
Momentum EMA Length: Default is 8. Controls the sensitivity of the pullback line.
Trend SMA Length: Default is 200. The standard for long-term trend filtering.
Gap Up % Threshold: Default is 3.0%. Minimum overnight gap size required to trigger a signal.
Resistance Lookback (Months): Default is 3. The script will look back this many months to find and draw the key resistance line.
Table Position: Move the checklist to any corner of your screen.
⚠️ Disclaimer
This tool is for educational purposes only and does not constitute financial advice. Always manage your risk and use a stop loss.
Wyckoff Schematic by Kingshuk GhoshThe "Wyckoff Schematic" is a Pine Script indicator that automatically detects and visualizes Wyckoff Method accumulation and distribution patterns in real-time. This professional tool helps traders identify smart money movements, phase transitions, and critical market structure points.
Key Features-
1. Wyckoff Pattern Detection
Auto-detection of all Wyckoff phases (A through E)
Accumulation patterns: SC, AR, Spring, SOS, LPS
Distribution patterns: BC, UTAD, LPSY
Real-time phase identification with color-coded visualization
2. Multi-Timeframe Analysis-
Main chart analysis with customizable lookback period
1M Wave View showing monthly perspective in a compact overlay
Daily data integration for current month analysis
Swing point detection with trend lines
3. Advanced Visualization-
Phase boxes with semi-transparent overlays
Critical event labels with anti-clutter spacing
Horizontal support/resistance lines (dynamic)
Zigzag trend lines for price structure
Comprehensive table showing current status and key events
4. Customizable Parameters-
Adjustable lookback period (20-300 bars)
Configurable volume spike multiplier
Customizable display options (labels, boxes, lines)
Adjustable zigzag sensitivity
Configurable wave view height and swing legs
Display Settings: Event labels, phase boxes, support/resistance lines
Visual Settings: Label size, transparency, offset percentage
Zigzag Settings: High/low length
Wave View Settings: Toggle, height percentage, swing legs
Color Scheme:
Phase A: Red
Phase B: Teal
Phase C: Blue
Phase D: Green
Phase E: Yellow
Bullish: Green
Bearish: Red
Alert System:
Critical event alerts: SC, AR, Spring, SOS, LPS, BC, UTAD, LPSY
Phase transition alerts: Markup phase entry ,Customizable alert conditions
How to Use-
For Beginners:
Apply the indicator to any chart
Enable "Auto-Detect Wyckoff Patterns"
Look for colored phase boxes (A-E)
Watch for critical event labels (SC, AR, Spring, etc.)
Check the table in top-right corner for current status
For Advanced Users:
Adjust lookback period based on trading timeframe
Modify volume multiplier for sensitivity
Customize display to reduce clutter
Use wave view for higher timeframe context
Set alerts for specific Wyckoff events
Unique Selling Points:
Comprehensive Detection: Covers all Wyckoff phases and critical events
Clean Visualization: Anti-overlap labeling, organized display
Multi-Timeframe: Combines current chart with monthly perspective
Educational: Helps learn Wyckoff methodology through visualization
Professional: Suitable for both retail and institutional analysis
Performance Notes:
Uses dynamic requests for multi-timeframe data
Includes max object limits to prevent performance issues
Efficient calculation methods for real-time analysis
Intended Users:
Price action traders
Wyckoff method practitioners
Market structure analysts
Swing traders and position traders
Educational purposes for learning market manipulation patterns
Works best on 4H,Daily,Weekly & Monthly Time frame
Suitable for all markets (stocks, forex, crypto, futures)
Support:
The indicator includes comprehensive tooltips and visual cues to help users understand each Wyckoff event and phase. The table provides quick reference to current market conditions and detected patterns.
This indicator transforms complex Wyckoff methodology into actionable visual signals, making institutional accumulation/distribution patterns accessible to all traders.
Disclaimer: This indicator is for educational purposes only. Always practice proper risk management and combine with your own analysis before making trading decisions. Happy trading.
Daily Trend Scanner Plus█ DAILY TREND SCANNER PLUS
A professional-grade trading indicator designed to help traders quickly identify intraday trend bias across multiple symbols by tracking price relationships to key technical levels: Prior Day High/Low (PDH/PDL) and Pre-Market High/Low (PMH/PML).
█ FEATURES
► Single Symbol Table
Compact 5-column table displaying PDH, PMH, PDL, PML, and Trend status for the current chart symbol. Shows green dot (🟢) when price breaks above high levels and red dot (🔴) when price breaks below low levels. Progress bars visualize how close price is to breaking key levels.
► Multi Symbol Table
Monitor up to 20 tickers simultaneously in a single table. Each row displays ticker name, price, change %, breakout dots, progress bars, and trend status. Optional columns for actual PMH/PML and PDH/PDL price values. Real-time updates for all symbols with color-coded change percentages.
► Table Sorting
- None - Displays tickers in input order
- Chg % - Sorts by daily change percentage (highest to lowest)
- Bullish - Prioritizes bullish setups at top
- Bearish - Prioritizes bearish setups at top
► PMH/PML Lines (Pre-Market High/Low)
Horizontal lines at pre-market high and low levels (4:00 AM - 9:29 AM ET). Customizable line styles, colors, labels, and optional price display.
► PDH/PDL Lines (Prior Day High/Low)
Horizontal lines at previous trading day's high and low. Uses RTH only for stocks (9:30 AM - 4:00 PM ET) and full 24-hour day for non equities.
► ORB Lines (Opening Range Breakout)
Captures high and low during the opening period with 5-minute, 10-minute, or 30-minute options. Lines persist from market open until next pre-market session.
► EMA Overlays
Three independent EMAs with customizable periods (default: 8, 20, 200). Third EMA can be switched to SMA. Multiple line styles available.
► VWAP Overlay
Volume Weighted Average Price with customizable line style, width, and color.
█ TREND LOGIC
- BULLISH: Price above BOTH Prior Day High AND Pre-Market High
Indicates strong upward momentum breaking through two resistance levels
- BEARISH: Price below BOTH Prior Day Low AND Pre-Market Low
Indicates strong downward momentum breaking through two support levels
- NEUTRAL: Price not above both highs or below both lows
Price is consolidating between key levels
█ PROGRESS BARS
Visual 5-block meter showing progress from midpoint toward target level:
▓▓▓▓▓ (80-100%) → ▓▓▓▓▒ (60-80%) → ▓▓▓▒▒ (40-60%) → ▓▓▒▒▒ (20-40%) → ▓▒▒▒▒ (0-20%)
Replaced with 🟢 or 🔴 when level is actually broken.
█ ASSET TYPE HANDLING
STOCKS:
- Pre-Market: 4:00 AM - 9:29 AM Eastern
- Prior Day: RTH only (9:30 AM - 4:00 PM Eastern)
NON-EQUITIES:
- Prior Day: Full 24-hour trading day
- Automatically detected via symbol type
█ RECOMMENDED SETTINGS
- Chart Timeframe: 10-minute recommended for multi-table accuracy
- Timeframes 60 minutes or less required for ORB functionality
- Enable extended hours on chart for accurate PMH/PML on stocks
█ USAGE TIPS
- Use Bullish sort to find strongest breakout candidates for long trades
- Use Bearish sort to find weakest stocks for short/put candidates
- Progress bars help anticipate upcoming breakouts before they happen
- Combine with ORB lines to confirm trend direction after market open
- Watch for alignment: Price above all key levels = strongest bullish signal
- PDH/PDL breaks often signal continuation of prior day's trend
- PMH/PML breaks can indicate gap-fill or trend reversal setups
█ INDICATOR SETTINGS
█ EXAMPLE OF FULL MULTI TABLE AND SINGLE TABLE
█ MULTI-TABLE SORTING
█ PMH/PML, PDH/PDL, ORB LINES
█ EMA AND VWAP OVERLAYS
█ CUSTOMIZATION
hap adxAdaptive ADX & DI Color Bars – Indicator Description
This indicator is an advanced ADX-based momentum and trend strength visualizer.
Instead of displaying raw ADX and DI values only, it dynamically changes bar colors
based on the relationship between ADX, +DI, and −DI, making market conditions
instantly readable.
Core Logic:
- Rising ADX indicates increasing momentum and trend strength
- Falling ADX signals weakening trend or transition to range
- +DI vs −DI defines bullish or bearish directional control
Color States:
Strong Bullish Trend:
- ADX is rising
- +DI is above −DI
- Shows strong bullish momentum and trend continuation
Weak / Early Bullish:
- +DI above −DI
- ADX flat or weakening
- Trend exists but momentum is not fully confirmed
Strong Bearish Trend:
- ADX is rising
- −DI is above +DI
- Strong bearish dominance and continuation
Weak / Early Bearish:
- −DI above +DI
- ADX weakening
- Selling pressure exists but momentum is fading
No-Trade / Range Zone:
- ADX is low or clearly declining
- +DI and −DI are close or frequently crossing
- Market is ranging or indecisive
Why This Indicator Is Useful:
- Removes the need to interpret raw ADX values
- Visually highlights trend strength, weakness, and transitions
- Helps avoid low-quality trades during weak momentum
- Works perfectly as a trend filter for scalping, day trading, and swing trading
Best Use Cases:
- Trend confirmation
- Momentum filtering
- Entry quality validation
- Avoiding false breakouts in low ADX conditions
srd786-Intraday VWAP Price Action IndicatorDISCLAIMER
This Pine Script indicator does not constitute financial advice; it is just intended for educational and informational purposes. It functions as a tool for technical analysis that could help traders spot possible trading opportunities. It is crucial to remember that participating in financial markets has a number of risks that might result in large losses and are not suitable for all investors.
Users are encouraged to conduct their own thorough investigation and analysis prior to using this indicator. Avoiding trading with money that one cannot afford to lose is essential. It is also advised to seek advice from a certified financial expert. Users must use suitable risk management techniques and recognize that past success does not guarantee future outcomes.
Any losses, damages, or other consequences resulting from the usage of this indicator are not the author's responsibility. The user is ultimately responsible for all trading decisions, therefore using this tool is at their own risk.
INTRODUCTION
The “srd786-Intraday VWAP Price Action Indicator” is a sophisticated Pine Script (version 6) trading tool designed for intraday traders who focus on New York session trading hours. This indicator combines multiple technical analysis concepts including Volume Weighted Average Price (VWAP), Average True Range (ATR) for risk management, swing point detection for support/resistance identification, and momentum analysis through RSI. The primary objective is to generate high-probability long and short signals based on price action confluence with trend, momentum, and key structural levels.
1.
VWAP (Volume Weighted Average Price): Shows the "fair" average price based on both price and trading volume.
2.
ATR (Average True Range): Measures how much the price typically moves each day.
3.
Trend Analysis: Identifies whether the market is going up, down, or sideways.
4.
Momentum Indicators: Shows how strong the current price movement is.
5.
Support & Resistance: Identifies key price levels where the price might stop or reverse.
6.
Swing Points: Finds significant turning points in the price.
This indicator is specifically optimized for the New York trading session (9:30 AM to 4:00 PM ET), making it particularly suitable for traders who focus on US market hours. It provides a complete trading framework that includes not only signal generation but also precise trade management levels including entry prices, stop-loss orders, and profit targets based on a configurable reward-to-risk ratio.
The philosophy behind this indicator is confluence-based trading. Rather than relying on a single indicator or condition, it requires multiple factors to align before generating a trade signal. This approach filters out lower-probability setups and focuses only on high-quality opportunities where price action, trend direction, momentum, and key technical levels all point in the same direction.
CORE CONCEPT AND METHODOLOGY
Volume Weighted Average Price (VWAP)
VWAP is the cornerstone of this indicator's trading methodology. Unlike a simple moving average that treats all price bars equally, VWAP incorporates volume data into its calculation, giving more weight to bars with higher trading volume. This makes VWAP a more accurate representation of the true average price where the most significant trading activity occurred.
The calculation of VWAP is performed using the built-in 'ta.vwap()' function, which computes the cumulative volume-weighted average price from the beginning of the session. For intraday traders, VWAP serves as a critical reference point that indicates whether the current price is trading at a premium (above VWAP) or discount (below VWAP) relative to the session's volume-weighted average.
In this indicator, the VWAP source is configurable through the 'vwapSource' parameter, with the default being HLC3 (High + Low + Close / 3). This source selection allows traders to experiment with different price types such as typical price, weighted close, or even custom sources to suit their trading style and market preferences.
Average True Range (ATR) for Risk Management
The Average True Range, calculated using 'ta.atr()', measures market volatility by decomposing the current range of price movement. ATR does not indicate price direction;
instead, it quantifies the degree of price movement or volatility over a specified period. In this indicator, ATR serves dual purposes: determining the distance for limit orders and calculating stop-loss levels.
The 'atrLength' parameter (default: 14) controls the lookback period for the ATR calculation. A shorter length makes the indicator more responsive to recent volatility, while a longer length provides a smoother average that may be more suitable for less volatile markets. The 'atrMultiplier' (default: 1.5) determines how many ATR units away the stop-loss is placed from the entry price, allowing traders to adjust their risk exposure based on current market conditions.
Swing Detection and Support/Resistance
Swing points represent significant turning points in price action where the market has temporarily exhausted its directional momentum. This indicator uses pivot high and pivot low calculations to identify swing highs and swing lows, which then form the basis for dynamic support and resistance levels.
The 'swingLength' parameter (default: 5) defines how many bars to the left and right of a potential pivot point must be lower (for pivot highs) or higher (for pivot lows) to confirm the swing point. This lookback period helps filter out minor price fluctuations and focuses on more significant structural levels.
Support and resistance levels are stored in arrays ('swingHighArray' and 'SwingLowArray'), with the most recent swing points serving as the primary reference levels. The 'srLookback' parameter (default: 20) controls the overall lookback window and also determines how many
swing points to maintain in each array, ensuring that only relevant historical levels are considered.
Breakout Detection
When a price moves past a major support or resistance level, this is known as a price breakout. This price breakout suggests that there is a possibility of a new trend direction heading forward.Breakout detection eliminates noise, as little price fluctuations or volatility may momentarily drive prices past a threshold without authentic conviction.Detection of breakouts affirms robustness when the price above the threshold by 2%, indicating genuine market interest, and mitigates whipsaws to prevent placing trades based on transient price swings.
The Breakout Tolerance parameter, set by default to 2%, regulates the breakout tolerance for the indicator. A price closure above the current high plus a minor tolerance buffer (usually 2%) indicates a potential continuation of upward movement, classified as a Bullish Breakout. Conversely, when the price closes below the recent low plus a minor tolerance buffer (usually 2%), it suggests that the price may continue to decline, which is classified as a Bearish Breakout Down.
Trend Identification
Trend determination is accomplished through an Exponential Moving Average (EMA) with a configurable length ('trendMaLength', default: 9). The indicator classifies trend into three
states: BULLISH (price above EMA with confirmation from the previous bar), BEARISH (price below EMA with confirmation), and SIDEWAYS (price crossing or near the EMA).
The EMA is chosen over simple moving averages because it responds more quickly to recent price changes while still providing enough smoothing to filter out noise. The confirmation requirement (both current and previous bar must be on the same side of the EMA) reduces false signals during periods of choppy price action.
Momentum Analysis
Momentum is measured using the Relative Strength Index (RSI) with a configurable length ('momentumLength', default: 9). RSI values are categorized into five states to provide nuanced momentum readings: STRONG BULL (RSI above 70), BUILDING (RSI between 55 and 70), NEUTRAL (RSI between 45 and 55), WEAKENING (RSI below 45), and STRONG BEAR (RSI below 30).
This momentum categorization allows traders to distinguish between strong trending conditions (STRONG BULL/BEAR) and transitions (BUILDING/WEAKENING), providing context for trade signals and helping to avoid entering positions during momentum divergences.
CONFIGURATION PARAMETERS
VWAP Settings
The 'vwapSource' parameter determines which price value is used in the VWAP calculation. The default value of 'hlc3' (High + Low + Close / 3) provides a balanced representation of each bar's price action. Traders can modify this to use typical price ('high + low + close / 3'), weighted close ('high + low + close + close / 4'), or other price types depending on their analytical preferences.
ATR Settings
The 'atrLength' parameter sets the lookback period for the Average True Range calculation. The default of 14 periods is standard across most trading platforms and timeframes, providing a good balance between responsiveness and smoothness. The 'atrMultiplier' parameter (default: 1.5) scales the ATR value to determine stop-loss distances. A multiplier of 1.5 means the stop-loss is placed 1.5 ATR units away from the entry price, providing enough buffer to accommodate normal volatility while limiting risk.
Trade Settings
The 'rrRatio' parameter (default: 3.0) establishes the reward-to-risk ratio for trade targets. A ratio of 2.0 means the profit target is twice the distance of the stop-loss from the entry price. The 'limitOrderDistance' parameter (default: 0.5) determines how far below (for long trades)
or above (for short trades) the current close the limit order is placed, measured in ATR units. This allows traders to enter positions at better prices while waiting for pullbacks.
Swing Detection Settings
The 'swingLength' parameter (default: 5) controls pivot identification sensitivity. Higher values identify more significant swing points but may miss shorter-term opportunities. The 'showSwings' boolean parameter toggles the visual display of swing high and low points on the chart.
Support & Resistance Settings
The 'srLookback' parameter (default: 20) defines how many bars back to search for swing points and support/resistance levels. The 'breakoutTolerance' parameter (default: 0.02 or 2%) adds a small buffer to breakout detection to account for minor penetration of support/resistance levels due to price spikes or slippage.
Trend & Momentum Settings
The 'trendMaLength' parameter (default: 9) sets the EMA length for trend determination, while 'momentumLength' (default: 9) sets the RSI lookback period. Both should be at least 5 periods for meaningful calculations.
Table Settings
The 'showTable' parameter (default: true) enables the display of two information tables that provide real-time data on Indicator values and trade levels.
SIGNAL GENERATION LOGIC
Long Signal Conditions
A long signal is generated when all the following conditions are simultaneously true:
1.
Session Filter: The trade must occur during New York session hours (9:30 AM - 4:00 PM ET).
2.
Trend Confirmation: The trend must be BULLISH (price above EMA with confirmation).
3.
Price Position: Current price must be above VWAP, indicating bullish price action.
4.
Breakout or No Resistance: Either price is breaking out above resistance level with tolerance, or there is no prior resistance level to overcome.
5.
Momentum Alignment: Momentum must be either STRONG BULL or BUILDING.
This confluence of conditions ensures that long trades are only taken when the market is trending higher, price is confirming strength by trading above VWAP, and momentum is supportive of continued upward movement.
Short Signal Conditions
A short signal is generated when all the following conditions are simultaneously true:
1.
Session Filter: The trade must occur during New York session hours
2.
Trend Confirmation: The trend must be BEARISH (price below EMA with confirmation)
3.
Price Position: Current price must be below VWAP, indicating bearish price action
4.
Breakout or No Support: Either price is breaking down below support level with tolerance, or there is no prior support level to overcome
5.
Momentum Alignment: Momentum must be either STRONG BEAR or WEAKENING
Similar to long signals, short trades require alignment across multiple timeframes and analytical approaches, filtering out counter-trend trades and focusing on high-probability setups.
TRADE MANAGEMENT FRAMEWORK
Entry Price Calculation
For long trades, the limit order price is calculated as: 'Close - (ATR Value × Limit Order Distance)'. This places the entry price below the current close, allowing traders to buy on dips while maintaining a favorable entry price. For short trades, the limit order is placed above the current close: 'Close + (ATR Value × Limit Order Distance)'.
The limit order distance is expressed in ATR units, making it adaptive to current volatility conditions. In more volatile markets, the limit order will be placed further from the current price, while in calmer markets, it will be closer.
Stop-Loss Placement
Stop-loss levels are calculated using the ATR multiplier to ensure adaptive risk management. For long trades: 'Entry Price - (ATR Value × ATR Multiplier)'. For short trades: 'Entry Price + (ATR Value × ATR Multiplier)'.
This adaptive approach to stop-loss placement means that in volatile markets, stops are wider to avoid being stopped out by normal price fluctuations, while in quieter markets, stops are tighter to limit potential losses. The default multiplier of 1.5 provides approximately 1.5 times the average true range of protection.
Target Price Calculation
Profit targets are determined by the reward-to-risk ratio: 'Entry Price + (ATR Stop Distance × RR Ratio)' for long trades and 'Entry Price - (ATR Stop Distance × RR Ratio)' for short trades. The default ratio of 2.0 means the target is twice the distance of the stop-loss, providing a favorable risk-reward profile.
New York Session Tracking
The indicator includes specialized logic for tracking the New York session open price. When a new NY session begins (determined by the 'isNewNySession' variable), the current open price is recorded and maintained throughout the session. This provides a reference point for measuring intraday directional bias from the session's starting level.
INFORMATION TABLES
Indicators Table
This table displays the current price, VWAP value, NY session open price, support level,resistance level, ATR, ATR-scaled stop distance, current trend classification, momentum state with RSI value, and breakout status. All values are color-coded based on their bullish or bearish implications. The VWAP cell is color-coded green if price is above VWAP (bullish) and red if below (bearish), providing instant visual confirmation of price's position relative to this critical level.
Trade Levels Table
This table shows current signal status (LONG, SHORT, or WAIT), limit order distance in ATR units, calculated limit order price, stop-loss level, and target price with the reward-to-risk ratio displayed. The signal cell is highlighted in green for long signals and red for short signals.
ALERT CONDITIONS
The indicator includes four alert conditions that can be configured in TradingView:
1.
LONG Signal: Triggers when a long signal is generated, providing entry price, stop-loss, and target information.
2.
SHORT Signal: Triggers when a short signal is generated with corresponding trade details.
3.
Breakout Up: Notifies when price breaks out above resistance level.
4.
Breakout Down: Notifies when price breaks down below support level.
These alerts enable traders to receive notifications via TradingView's alert system without continuously monitoring the charts.
USAGE EXAMPLES AND TRADING SCENARIOS
Strong Bullish Trend with VWAP Support
In this scenario, price has been trading above the 9-period EMA for multiple bars, confirming a bullish trend. The current price is above VWAP, indicating buyers are willing to pay a premium. A recent swing low has established a support level, and RSI is reading 65, indicating building momentum without being overextended. When price breaks above the recent swing high resistance with a 2% tolerance, the indicator generates a long signal. The trader places a limit order below the current bar's close (0.5 ATR units) and sets the stop-loss 1.5 ATR units below the entry, with a target 2.0 times the stop distance away.
Short Setup During Volatile Session
During a particularly volatile NY session, price gaps down below VWAP early in the day. The 9-period EMA is declining, and both current and previous bars are below it, confirming a bearish trend. The RSI has dropped to 28, indicating strong bearish momentum. A recent swing high serves as resistance, and when price breaks below the swing low support level, the indicator generates a short signal. The trader enters on a limit order placed 0.5 ATR units above the current price, with the stop-loss 1.5 ATR units above the entry and the target at a 2.0 reward-to-risk ratio.
Avoiding Counter-Trend Trades
Consider a scenario where price is above VWAP and the RSI reads 72 (overbought), but the price is below the 9-period EMA and the previous bar was also below the EMA. In this case, the trend is classified as BEARISH (or SIDEWAYS) despite the bullish price position relative to VWAP. The indicator will not generate a long signal because the trend condition is not met, protecting the trader from what could be a bear trap or continuation pattern.
No Prior Levels Scenario
At the beginning of a trading session or after significant volatility has cleared prior swing points, there may be no established support or resistance levels in the lookback window. In this case, the breakout condition 'or na(resistanceLevel)' allows long signals to be generated without requiring a resistance level to be broken, enabling traders to participate in emerging trends without waiting for prior levels to form.
BEST PRACTICES AND TIPS
Timeframe Selection
This indicator is optimized for intraday timeframes (1-minute to 60-minute charts) and specifically for NY session trading. Higher timeframes may produce more reliable signals but fewer opportunities, while lower timeframes will generate more signals but with potentially lower reliability. Traders should backtest on their preferred timeframe before trading live.
Market Conditions
The indicator performs best in trending markets with clear directional bias. During ranging or sideways markets, the trend condition may oscillate frequently, and VWAP may oscillate around price, reducing signal quality. Consider filtering signals or reducing position size during low-volatility, range-bound conditions.
Parameter Optimization
While the default parameters have been selected for general applicability, traders should consider optimizing certain parameters for specific markets or instruments. For highly volatile instruments like crude oil or natural gas, increasing the 'atrMultiplier' to 2.0 or 2.5 may provide more appropriate risk management. For less volatile instruments like certain forex pairs, reducing the multiplier to 1.0 or 1.2 may improve signal quality.
Multiple Timeframe Analysis
For enhanced performance, traders can analyze the trend on a higher timeframe (such as 15-minute or hourly) while taking signals on a lower timeframe (such as 5-minute or 1-minute). This multi-timeframe approach ensures that signals are aligned with the larger trend direction.
Risk Management
While the indicator provides calculated stop-loss levels, traders should consider their overall position sizing and portfolio risk. The ATR-based stops provide a market-adaptive approach, but individual risk tolerance and account size should ultimately determine position sizing. The 2.0 reward-to-risk ratio is fixed but can be adjusted based on personal preferences or the specific characteristics of the instrument being traded.
INTEGRATION WITH TRADINGVIEW
Adding the Indicator
To add this indicator to a TradingView chart, paste the code into the Pine Script editor and click "Add to Chart." The indicator will appear in the chart's sidebar and begin calculating immediately once sufficient historical data is available.
Configuring Alerts
To set up alerts, right-click on any of the alert conditions in the indicator's settings panel (long signal, short signal, breakout up, or breakout down) and select "Add Alert." Configure the alert frequency and notification methods (push notification, email, webhook, etc.) according to your preferences.
Customization
All input parameters can be adjusted through the indicator's settings panel without modifying the source code. Traders can experiment with different VWAP sources, ATR lengths and multipliers, swing detection parameters, and table display options to suit their trading style and market preferences.
LIMITATIONS AND CONSIDERATIONS
Session Dependency
The indicator is specifically designed for NY session trading and will not generate signals outside these hours. Traders focused on other sessions or 24-hour markets may need to modify the session string to match their trading hours.
Historical Data Requirements
The indicator requires sufficient historical data to accurately calculate swing points and support/resistance levels. On lower timeframe charts with limited history, the initial signals may be less reliable until adequate swing points are identified.
Lag in Swing Detection
By definition, swing points are confirmed after the price has moved away from them, introducing some lag into support/resistance identification. Traders should be aware that the most recent swing point may not be confirmed until several bars after it occurs.
Not Financial Advice
This indicator is a technical analysis tool and should not be construed as financial advice. Traders are responsible for their own research and risk management decisions. Past performance of any trading system does not guarantee future results.
SUMMARY
The code follows a logical flow:
•
Version and Declaration: Pine Script version 6 indicator declaration with overlay enabled
•
Input Parameters: All user-configurable settings grouped by category
•
Session Logic: New York session tracking and open price recording
•
Core Calculations: VWAP, ATR, EMA, RSI, swing points
•
Support/Resistance Logic: Array-based storage and retrieval of swing levels
•
Trend and Momentum Classification: Categorization of current market state
•
Signal Generation: Confluence-based long and short conditions
•
Trade Level Calculations: Entry, stop-loss, and target pricing
•
Visual Plots: Hidden plots for alert data access
•
Information Tables: Real-time display of key values
•
Alert Conditions: Four configurable alert triggers
This structured approach ensures clarity, maintainability, and extensibility for future modifications or enhancements.
Smart Trader, Episode 02, by Ata Sabanci | Battle of Candles ⚠️ CRITICAL: READ BEFORE USING ⚠️
This indicator is 100% VOLUME-BASED and requires Lower Timeframe (LTF) intrabar data for accurate calculations. Please understand the following limitations before using:
📊 DATA ACCURACY LEVELS:
• 1T (Tick) — Most accurate, real volume distribution per tick
• 1S (1 Second) — Reasonably accurate approximation
• 15S (15 Seconds) — Good approximation, longer historical data available
• 1M (1 Minute) — Rough approximation, maximum historical data range
⚠️ BACKTEST & REPLAY LIMITATIONS:
• Replay mode results may differ from live trading due to data availability
• For longer back test periods, use higher LTF settings (15S or 1M)
• Not all symbols/exchanges support tick-level data
• Crypto and Forex typically have better LTF data availability than stocks
💡 A NOTE ON TOOLS:
Successful trading requires proper tools. Higher TradingView plans provide access to more historical intrabar data, which directly impacts the accuracy of volume-based calculations. More precise volume data leads to more reliable signals. Consider this when evaluating your trading infrastructure.
📌 OVERVIEW
Smart Trader Episode 02: Battle of Candles is an advanced educational indicator that combines multiple analysis engines to help traders identify market scenarios and understand market dynamics. This is NOT financial advice or a trading signal service — it's a learning tool designed to help you understand how institutional traders might interpret price action.
The indicator integrates 7 major analysis engines into a unified dashboard, providing real-time insights into volume flow, trend structure, market phases, and potential trade setups.
⚡ KEY FEATURES
🎯 16-Pattern Scenario Engine
Automatically detects and classifies market conditions into 16 distinct scenarios, from strong continuation moves to potential reversals and traps.
💰 Trade Advisor Panel
Aggregates all signals into actionable suggestions with confidence levels, suggested entry/SL/TP levels, and risk/reward calculations.
📊 Volume Engine
Splits volume into buy/sell components using either Geometry (candle shape) or Intrabar (LTF data) methods for precise delta analysis.
📈 CVD (Cumulative Volume Delta)
Tracks the running total of buying vs selling pressure to identify accumulation, distribution, and divergences.
🎯 Stop-Hunt Detection
Identifies potential stop-hunt patterns where price sweeps liquidity levels before reversing.
📐 Pure Structure Trend Engine
Zero-lag trend detection based on swing highs/lows (HH/HL/LH/LL) without any lagging indicators.
⚡ Effort vs Result Analysis
Measures energy spent (volume) versus ground taken (price movement) to detect stalls, breakthroughs, and exhaustion.
🎯 SCENARIO ENGINE — 16 Market Patterns
The Scenario Engine analyzes multiple factors (candle anatomy, volume, forces, CVD, wick analysis) to classify each candle into one of 16 scenarios:
Continuation Scenarios (1-3)
1. ⚔️ STRONG MOVE — Big body candle (>60%) with volume confirming direction. Indicates strong momentum continuation.
2. 🛡️ ABSORPTION — One side attacks but the other absorbs the pressure. Price holds despite volume. Continuation expected in the absorbing side's favor.
3. 📉 PULLBACK — Small move against the trend with low volume. Indicates a healthy retracement before trend continuation.
Reversal Scenarios (4-6, 13-16)
4. 💥 REJECTION — Big wick (>40%) with small body and high volume. Price was rejected
at a level, potential reversal.
5. 🪤 TRAP — Pin direction disagrees with delta. Extreme wick size. Looks bullish/bearish but the opposite may happen.
6. 😫 EXHAUSTION — High energy spent (volume) but low ground taken (price movement). Both sides active but momentum fading.
13. 🔄 CVD BULL DIV — Price falling but CVD rising. Hidden buying detected (accumulation). Potential bullish reversal.
14. 🔄 CVD BEAR DIV — Price rising but CVD falling. Hidden selling detected (distribution). Potential bearish reversal.
15. 🎯 STOP HUNT BULL — Shorts were liquidated below support. Price swept liquidity and reversed. Expect bullish move.
16. 🎯 STOP HUNT BEAR — Longs were liquidated above resistance. Price swept liquidity and reversed. Expect bearish move.
Range/Stalemate Scenarios (7-9)
7. ⚖️ DEADLOCK — Market in balance. Force ratio between 0.4-0.6. Low volume. No side winning.
8. 🔥 BATTLE — High volume fight in a range. Both sides attacking. Wicks on both ends of candle.
9. 🎯 WAITING — Building phase with quiet volume. Market is preparing but no trigger yet. Wait for breakout.
Pre-Breakout Scenarios (10-12)
10. 🚀 BULL SETUP — Buyers accumulating in a building phase. Positive delta building. Bullish pressure growing.
11. 💣 BEAR SETUP — Sellers distributing in a building phase. Negative delta building. Bearish pressure growing.
12. ⚡ BREAKOUT — Price at boundary with strong candle and volume supporting. Imminent breakout expected.
💰 TRADE ADVISOR ENGINE
The Trade Advisor aggregates all signals from the different engines into a single actionable output. It uses a weighted scoring system:
Scoring Weights:
• Scenario Signal: 30%
• Trend Alignment: 20%
• CVD Momentum: 15% + Divergence Bonus
• Pin Forces: 15%
• Liquidity Sweep: 12%
• Stop-Hunt Detection: 10%
• Effort vs Result: 10%
Possible Actions:
• ⏳ WAIT — Edge not strong enough (stay patient)
• 🟢 LONG ENTRY — Buyers have strong advantage + signals align
• 🔴 SHORT ENTRY — Sellers have strong advantage + signals align
• ⚠️ CLOSE LONG/SHORT — Position at risk (reversal/trend flip)
• 🛑 STOP LOSS — Price hit risk threshold
• 💰 TAKE PROFIT — Target threshold reached
📊 EXTENDED INFO PANEL (Detailed Explanations)
The Extended Info panel is hidden by default (toggle: Show Extended Info in settings). It provides detailed metrics that feed into the main engines:
CVD ANALYSIS
What is CVD?
Cumulative Volume Delta (CVD) is the running total of Buy Volume minus Sell Volume. It reveals the underlying buying/selling pressure that may not be visible in price alone.
CVD Value & Slope:
• ↗ Rising: CVD increasing = net buying pressure (bullish)
• ↘ Falling: CVD decreasing = net selling pressure (bearish)
• → Flat: No clear pressure direction
Accumulation vs Distribution:
• Accumulation %: Shows buying pressure strength (0-100). High accumulation with CVD rising = strong bullish bias.
• Distribution %: Shows selling pressure strength (0-100). High distribution with CVD falling = strong bearish bias.
Divergence Alerts:
• ⚠️ BULLISH DIVERGENCE: Price falling but CVD rising. Hidden buying = potential reversal UP.
• ⚠️ BEARISH DIVERGENCE: Price rising but CVD falling. Hidden selling = potential reversal DOWN.
WICK ANALYSIS
Wick Torque:
Torque measures the "rotational force" from wicks. It's calculated from wick length, volume, and body efficiency.
• Positive Torque (Bullish): Bottom wick power dominates. Buyers defended lower prices.
• Negative Torque (Bearish): Top wick power dominates. Sellers defended higher prices.
• ⚡ High Torque (>30): Strong signal, significant wick rejection occurred.
Stop-Hunt Detection:
The engine detects when price has likely swept stop-losses clustered at key levels:
• Stop Hunt Risk %: Likelihood score (0-100). Above 55% = confirmed hunt.
• "Shorts hunted": Price swept below support, liquidating shorts, expect bounce UP.
• "Longs hunted": Price swept above resistance, liquidating longs, expect drop DOWN.
LIQUIDITY SWEEPS
This section appears only when a liquidity sweep is detected. The engine monitors for price sweeping recent highs/lows and then reversing:
• 🎯 LIQUIDITY SWEPT ABOVE: Price broke recent highs but closed back below. Longs trapped, expect DOWN.
• 🎯 LIQUIDITY SWEPT BELOW: Price broke recent lows but closed back above. Shorts trapped, expect UP.
POWER BALANCE
The Power Balance meter shows the real-time strength comparison between buyers and sellers.
Force Ratio:
• 0% = Complete seller dominance
• 50% = Perfect balance
• 100% = Complete buyer dominance
Visual Bar:
• Left side (▓): Bear territory
• Right side (▓): Bull territory
• The bar is smoothed over recent history to reduce noise.
EFFORT vs RESULT
This section measures the efficiency of price movement relative to volume expended.
Energy:
How much volume was spent relative to the average. Energy > 1.0x means above-average volume activity.
Ground:
How much price movement occurred relative to average range. Ground > 1.0x means above-average price movement.
STALL Warning:
A STALL is detected when high energy is spent but low ground is taken (high effort, low result). This often indicates institutional battle, exhaustion, or imminent reversal.
MARKET PHASE
The Phase Engine classifies the current market regime:
RANGE : No clear trend. Price confined to middle of channel. Low ADX. Balanced forces. Trade breakouts with caution.
BUILDING : Compression/preparation phase. Channel tightening or boundary penetration without follow-through. Watch for breakout direction.
TRENDING : Active directional move. Clear slope, good efficiency, price on trending side of channel. Favor pullback entries.
Strength:
0-100% score combining slope, volume validity, and force/efficiency filters.
Bars: How many candles the current phase has persisted.
TRACK RECORD (Validation Panel)
Enable with Show Validation Panel in settings. This section tracks the historical accuracy of scenario predictions:
Accuracy: Percentage of validated predictions that were correct.
Best/Worst Scenario: Shows which scenarios have the highest and lowest accuracy on the current symbol.
Recent Signals: Last 5 predictions with their outcomes. ✓ = correct, ✗ = wrong, ⏳ = pending validation.
⚙️ SETTINGS GUIDE
📊 Volume Analysis
Volume Calculation: Choose Geometry (estimates from candle shape) or Intrabar (precise LTF data).
Intrabar Resolution: LTF for precise mode. Try 1S, 15S, or 1T. Must be lower than chart timeframe.
History Depth: Candles stored in memory (5-50). Higher = more context, slower.
Memory Lookback: Bars for moving averages and Z-scores (10-100).
🏷️ Market Phase
Range Zone Width: How much of channel center is considered "range" (0.1-0.8).
Trend Sensitivity: Minimum slope to detect trending. Lower = more sensitive.
Min Episode Length: Minimum bars before phase can change. Prevents flickering.
🎯 Scenarios
Min Confidence to Show: Only display scenarios above this confidence level (30-90).
Bars to Validate: How many bars to wait before checking if prediction was correct.
Success Move %: Minimum price movement to consider prediction successful.
💰 Trade Advisor
Min Confidence for Entry: Minimum confidence to suggest a trade entry (50-90).
Default Risk %: Stop loss distance as % of price (0.5-5.0).
Min Risk/Reward: Minimum acceptable R:R ratio (1.0-5.0).
🔔 ALERT CONDITIONS
The indicator provides the following alert conditions you can configure:
• 🟢 LONG Entry Signal
• 🔴 SHORT Entry Signal
• ⚠️ Close LONG Signal
• ⚠️ Close SHORT Signal
• 🛑 STOP LOSS Alert
• 💰 Take Profit Alert
• 🚨 High Urgency Signal
⚠️ IMPORTANT DISCLAIMER
EDUCATIONAL TOOL ONLY
This indicator is designed for educational purposes to help users identify different market scenarios and understand how various signals might be interpreted.
The Trade Advisor is NOT a recommendation to buy, sell, or invest.
• Past performance does not guarantee future results
• All trading involves risk of loss
• The creator is not a licensed financial advisor
• Always do your own research (DYOR)
• Consult a qualified financial advisor before making any investment decisions
By using this indicator, you acknowledge that you understand these risks and accept full responsibility for your trading decisions.
Arbitrage Matrix [LuxAlgo]The Arbitrage Matrix is a follow-up to our Arbitrage Detector that compares the spreads in price and volume between all the major crypto exchanges and forex brokers for any given asset.
It provides traders with a comprehensive view of the entire marketplace, revealing hidden relationships among different exchanges for the same asset and offering easy, visual comparisons.
🔶 USAGE
Arbitrage is the practice of taking advantage of price differences for the same asset across different markets. Arbitrage traders look for these discrepancies to profit from buying where it’s cheaper and selling where it’s more expensive to capture the spread.
For begginers this tool is a clear snapshot of how different markets value the same asset, making global price dynamics easy to grasp.
For advanced traders it is a powerful scanner for arbitrage setups, helping you identify where the biggest opportunities lie in real time.
Arbitrage opportunities are often short‑lived, but they can be highly profitable. By showing you where spreads exist, this tool helps traders:
Understand market inefficiencies
Avoid trading at unfavorable prices
Identify potential profit opportunities across exchanges
By default, the tool searches all the enabled sources for the asset in the chart. It uses crypto exchanges as sources for crypto assets and forex brokers for all other assets.
The data is displayed on a dashboard, which is the tool's only visual element.
Traders can enable or disable any exchange or broker from the settings panel. All are enabled by default.
🔹 Displayable Data
Traders can choose from four types of data to display: last price, last volume, average price, and average volume.
Note that price and volume data may not be available for all assets at all sources, and sources without data will not be displayed.
As the image shows, each chart displays a different type of data for the same asset. In this case, the asset is ETHUSDT.
🔹 Reading the Matrix
Traders must read the data in a row-by-column format, as shown in the following example.
Assume that we are charting BTCUSDT Daily. In the row, we have Exchange A; in the column, we have Exchange B. The data is the average price, and the value is 100. The default length for the average is 20.
It reads like this: The average BTCUSDT price over the last 20 days is $100 higher on Exchange A than on Exchange B.
If the value were -100, it would mean that the average price is $100 lower in Exchange A than in Exchange B.
🔹 Matrix Style
Traders can change the colors and disable the background gradient, which is enabled by default.
They can also fine-tune the location and dashboard size from the settings panel.
🔶 SETTINGS
Sources: Choose between crypto exchanges, forex brokers, or automatic selection based on the asset in the chart.
Average Length: Select the length for the price and volume averages.
Crypto Exchanges: Enable or disable any available exchange.
Forex Brokers: Enable or disable any available broker.
🔹 Dashboard
Data: Select the data to display.
Position: Select the dashboard location.
Size: Select the dashboard size.
🔹 Style
Bullish: Select bullish color.
Bearish: Select bearish color.
Background Gradient: Enable background gradient color.
Ichimoku + EMA + RSI [Enhanced]# **Ichimoku + EMA + RSI Strategy - User Instructions**
---
## **📋 TABLE OF CONTENTS**
1. (#installation)
2. (#strategy-overview)
3. (#parameter-configuration)
4. (#understanding-the-dashboard)
5. (#entry--exit-rules)
6. (#best-practices)
7. (#optimization-guide)
8. (#troubleshooting)
---
## **🚀 INSTALLATION**
### **Step 1: Add to TradingView**
1. Open TradingView.com
2. Click **Pine Editor** (bottom of screen)
3. Click **"New"** → Select **"Blank indicator"**
4. Delete all default code
5. **Copy and paste** the complete script
6. Click **"Save"** (give it a name: "Ichimoku EMA RSI Strategy")
7. Click **"Add to Chart"**
### **Step 2: Verify Installation**
✅ You should see:
- Orange **200 EMA** line
- Blue **Tenkan** line
- Red **Kijun** line
- Green/Red **Cloud** (Ichimoku cloud)
- **Dashboard** in top-right corner
- **Strategy Tester** tab at bottom
---
## **📊 STRATEGY OVERVIEW**
### **What This Strategy Does**
Combines three powerful technical indicators to identify high-probability trades:
| Component | Purpose |
|-----------|---------|
| **200 EMA** | Determines overall trend direction |
| **Ichimoku Cloud** | Provides support/resistance and momentum |
| **RSI** | Filters momentum strength |
| **Dashboard** | Real-time signal analysis |
### **Trading Logic**
- **LONG**: Enter when all bullish conditions align
- **SHORT**: Enter when all bearish conditions align
- **EXITS**: Automatic via trailing stops, cloud breach, or TK cross reversal
---
## **⚙️ PARAMETER CONFIGURATION**
### **🔵 Trend Filter Settings**
```
EMA Length: 200 (default)
```
- **Lower (100-150)**: More sensitive, faster signals
- **Higher (250-300)**: More stable, slower signals
- **Recommendation**: Keep at 200 for most timeframes
---
### **🟢 RSI Settings**
```
RSI Length: 14 (default)
RSI Long Minimum: 55
RSI Short Maximum: 45
```
**Adjustment Guide:**
- **Aggressive** (more signals): Long=50, Short=50
- **Balanced** (default): Long=55, Short=45
- **Conservative** (fewer signals): Long=60, Short=40
---
### **🟡 Ichimoku Settings**
```
Tenkan Period: 9
Kijun Period: 26
Senkou B Period: 52
Displacement: 26
```
**Standard Configurations:**
| Timeframe | Tenkan | Kijun | Senkou B |
|-----------|--------|-------|----------|
| **1H - 4H** | 9 | 26 | 52 |
| **15m - 1H** | 7 | 22 | 44 |
| **Daily** | 9 | 26 | 52 |
**Filters:**
- ✅ **Require Chikou Confirmation**: Adds extra validation (recommended)
- ✅ **Require Cloud Position**: Price must be above/below cloud (recommended)
---
### **🔴 Risk Management**
```
ATR Length: 14
ATR Stop Loss Multiplier: 2.0
ATR Take Profit Multiplier: 3.0
Min Bars Between Trades: 3
```
**Risk/Reward Profiles:**
| Profile | SL Multiplier | TP Multiplier | Description |
|---------|---------------|---------------|-------------|
| **Conservative** | 2.5 | 4.0 | Wider stops, higher R:R |
| **Balanced** | 2.0 | 3.0 | Default settings |
| **Aggressive** | 1.5 | 2.5 | Tighter stops, faster exits |
---
### **🎨 Display Settings**
```
Show Dashboard: ON
Show Entry Signals: ON
```
- **Dashboard**: Shows real-time analysis
- **Entry Signals**: Green/Red arrows on chart
---
## **📈 UNDERSTANDING THE DASHBOARD**
### **Dashboard Components**
```
┌─────────────────────┬──────────┐
│ Component │ Status │
├─────────────────────┼──────────┤
│ EMA Trend │ BULL/BEAR│
│ Cloud │ ABOVE/BELOW/INSIDE│
│ TK Cross │ BULL/BEAR│
│ RSI │ 55.3 │
│ Chikou │ BULL/BEAR│
│ Signal │ STRONG LONG│
└─────────────────────┴──────────┘
```
### **Signal Interpretation**
| Signal | Score | Meaning | Action |
|--------|-------|---------|--------|
| **STRONG LONG** | 7+ | All conditions aligned | High confidence LONG |
| **LONG** | 4-6 | Most conditions met | Moderate confidence |
| **NEUTRAL** | <4 | Mixed signals | Wait for clarity |
| **SHORT** | 4-6 | Bearish bias | Moderate SHORT |
| **STRONG SHORT** | 7+ | All bearish conditions | High confidence SHORT |
---
## **📍 ENTRY & EXIT RULES**
### **✅ LONG ENTRY CONDITIONS**
All must be TRUE:
1. ✅ Price **above** 200 EMA
2. ✅ Price **above** Ichimoku Cloud
3. ✅ Tenkan **crosses above** Kijun (TK Bull Cross)
4. ✅ RSI **above** 55
5. ✅ Chikou **above** price 26 bars ago
6. ✅ Minimum bars since last trade met
**Visual Confirmation:**
- 🟢 Green triangle **below** candle
- Dashboard shows **"STRONG LONG"**
---
### **❌ LONG EXIT CONDITIONS**
Any ONE triggers exit:
1. ❌ Price closes **below** cloud bottom
2. ❌ Tenkan **crosses below** Kijun
3. ❌ ATR trailing stop hit (2.0 × ATR)
4. ❌ Take profit hit (3.0 × ATR)
---
### **✅ SHORT ENTRY CONDITIONS**
All must be TRUE:
1. ✅ Price **below** 200 EMA
2. ✅ Price **below** Ichimoku Cloud
3. ✅ Tenkan **crosses below** Kijun (TK Bear Cross)
4. ✅ RSI **below** 45
5. ✅ Chikou **below** price 26 bars ago
6. ✅ Minimum bars since last trade met
**Visual Confirmation:**
- 🔴 Red triangle **above** candle
- Dashboard shows **"STRONG SHORT"**
---
### **❌ SHORT EXIT CONDITIONS**
Any ONE triggers exit:
1. ❌ Price closes **above** cloud top
2. ❌ Tenkan **crosses above** Kijun
3. ❌ ATR trailing stop hit (2.0 × ATR)
4. ❌ Take profit hit (3.0 × ATR)
---
## **💡 BEST PRACTICES**
### **Recommended Timeframes**
| Timeframe | Trading Style | Signals/Week |
|-----------|---------------|--------------|
| **15m** | Scalping | 20-30 |
| **1H** | Day Trading | 10-15 |
| **4H** | Swing Trading | 5-10 |
| **Daily** | Position Trading | 2-5 |
---
### **Asset Classes**
✅ **Best Performance:**
- Major Forex pairs (EUR/USD, GBP/USD)
- Crypto (BTC/USD, ETH/USD)
- Major indices (SPX, NAS100)
⚠️ **Use Caution:**
- Low liquidity pairs
- Highly volatile altcoins
- Stocks with gaps
---
### **Risk Management Rules**
```
1. Never risk more than 2% per trade
2. Use the built-in ATR stops (don't override)
3. Respect the "Min Bars Between Trades" cooldown
4. Don't trade during major news events
5. Monitor dashboard - only trade STRONG signals
```
---
## **🔧 OPTIMIZATION GUIDE**
### **Step 1: Run Initial Backtest**
1. Open **Strategy Tester** tab (bottom of screen)
2. Set date range (minimum 6 months)
3. Review:
- **Net Profit**
- **Win Rate** (target: >50%)
- **Profit Factor** (target: >1.5)
- **Max Drawdown** (target: <20%)
---
### **Step 2: Optimize Parameters**
**If Win Rate is Low (<45%):**
- Increase RSI thresholds (Long=60, Short=40)
- Enable both Chikou + Cloud filters
- Increase "Min Bars Between Trades" to 5
**If Too Few Signals:**
- Decrease RSI thresholds (Long=50, Short=50)
- Reduce EMA to 150
- Adjust Ichimoku to faster settings (7/22/44)
**If Drawdown is High (>25%):**
- Increase ATR Stop Loss Multiplier to 2.5
- Add longer cooldown period (5+ bars)
- Trade only STRONG signals
---
### **Step 3: Forward Test**
```
1. Paper trade for 2-4 weeks
2. Compare results to backtest
3. Adjust if live results differ significantly
4. Only go live after consistent paper trading success
```
---
## **🛠️ TROUBLESHOOTING**
### **Problem: No Signals Appearing**
**Solutions:**
- Check RSI levels aren't too restrictive
- Verify timeframe is appropriate (try 1H or 4H)
- Ensure both filters aren't enabled on ranging markets
- Review dashboard - components may be conflicting
---
### **Problem: Too Many Losing Trades**
**Solutions:**
- Enable **both** Chikou + Cloud filters
- Increase RSI thresholds (more conservative)
- Only trade when dashboard shows "STRONG" signals
- Increase cooldown period to avoid overtrading
---
### **Problem: Dashboard Not Showing**
**Solutions:**
- Verify "Show Dashboard" is enabled in settings
- Check chart isn't zoomed out too far
- Refresh chart (F5)
- Re-add indicator to chart
---
### **Problem: Stops Too Tight/Wide**
**Solutions:**
- **Too Tight**: Increase ATR Stop Loss Multiplier to 2.5-3.0
- **Too Wide**: Decrease to 1.5-1.8
- Verify ATR Length is appropriate for timeframe
- Consider asset volatility (crypto needs wider stops)
---
## **📞 QUICK REFERENCE CARD**
```
═══════════════════════════════════════════════════
STRATEGY QUICK REFERENCE
═══════════════════════════════════════════════════
BEST TIMEFRAMES: 1H, 4H, Daily
BEST ASSETS: Major Forex, BTC, ETH, Indices
RISK PER TRADE: 1-2% of capital
LONG ENTRY:
✓ Price > 200 EMA
✓ Price > Cloud
✓ TK Bull Cross
✓ RSI > 55
✓ Dashboard = STRONG LONG
SHORT ENTRY:
✓ Price < 200 EMA
✓ Price < Cloud
✓ TK Bear Cross
✓ RSI < 45
✓ Dashboard = STRONG SHORT
EXITS:
× Cloud breach
× TK reverse cross
× ATR trailing stop
× Take profit (3:1 R:R)
═══════════════════════════════════════════════════
```
---
## **⚠️ DISCLAIMER**
This strategy is for **educational purposes only**. Always:
- Backtest thoroughly on your specific assets
- Paper trade before going live
- Never risk more than you can afford to lose
- Past performance ≠ future results
- Consider market conditions and your risk tolerance
---
**Happy Trading! 📈**
TradingView — Track All Markets
Where the world charts, chats, and trades markets. We're a supercharged super-charting platform and social network for traders and investors. Free to sign up.
***CILGIN INDIKATOR***ÇILGIN INDICATOR – User Guide
OVERVIEW
ÇILGIN INDICATOR is a multi-layer trend and momentum confirmation tool designed for discretionary traders.
It combines Relative RSI, EMA structure, SuperTrend logic, Momentum, and optional CCI & ADX filters into a single visual system.
Purpose:
Filter market noise, confirm trend strength, and highlight high-probability Buy / Sell zones.
The indicator works on all symbols and all timeframes.
RELATIVE RSI & MOMENTUM
The indicator can work in two modes:
NORMAL MODE (Formula OFF)
RSI is calculated directly from the chart symbol.
FORMULA MODE (Formula ON)
RSI is calculated from a relative price formula:
Base Symbol / Denominator 1 / Denominator 2
This allows relative strength analysis against indices, sectors, or benchmarks.
RSI SIGNAL LOGIC
RSI Signal Line = SMA of RSI
RSI 50 Level = Trend bias reference
BUY SIGNAL
RSI crosses above the signal line
Optional: RSI must also cross above 50 (Double Confirmation)
SELL SIGNAL
RSI crosses below the signal line
Optional: RSI must also cross below 50
Small arrows on the chart represent RSI-based Buy and Sell signals.
EMA STRUCTURE
Five adaptive EMAs are plotted: EMA 1
EMA 5
EMA 21
EMA 50
EMA 100
EMA lengths automatically adapt to timeframe speed.
EMA BUY LOGIC
Fast EMA crosses above any slower EMA.
EMA SELL LOGIC
Fast EMA crosses below any slower EMA.
EMAs define:
Trend direction
Dynamic support and resistance
Momentum shifts
SUPERTREND SYSTEM
A custom ATR-based SuperTrend is used.
Features:
Optional candle wick usage
Dynamic trailing stop
Visual Buy / Sell labels
SUPERTREND BUY
Trend flips from bearish to bullish.
SUPERTREND SELL
Trend flips from bullish to bearish.
Colored zones visualize the active trend direction.
STRONG BUY & STRONG SELL SIGNALS
A Strong Signal is generated only when multiple conditions agree.
STRONG BUY
RSI Buy Signal
SuperTrend Buy Signal
Optional CCI Filter confirmation
Optional ADX Filter confirmation
STRONG SELL
RSI Sell Signal
SuperTrend Sell Signal
Optional CCI Filter confirmation
Optional ADX Filter confirmation
Strong signals are displayed as large labeled markers: “STRONG BUY”
“STRONG SELL”
Designed for trend-following entries, not market noise.
CCI & ADX FILTERS (OPTIONAL)
CCI FILTER
Buy allowed only if CCI > 0
Sell allowed only if CCI < 0
ADX FILTER
ADX must be above minimum level
Direction confirmed using +DI and -DI
These filters help avoid sideways markets and weak trends.
INFORMATION PANELS
PANEL A (Top Right)
Daily percentage change
Weekly percentage change
Monthly percentage change
Daily volume (millions)
PANEL B (Bottom Right)
Relative RSI value
RSI signal value
Relative momentum
Market status (Bull / Bear)
Provides instant market context without extra indicators.
ALERTS
Built-in alerts are available for:
STRONG BUY
STRONG SELL
Suitable for automation and watchlist monitoring.
BEST PRACTICES
Use Formula Mode for relative strength analysis
Enable CCI & ADX filters on higher timeframes
Combine signals with price action and key levels
Do not use as a standalone trading system
DISCLAIMER
This indicator is a decision-support tool and does not provide financial advice.
Always manage risk and confirm signals with your own analysis.
Momentum Status Tracker by VKKScript Coder: Vivek K.
Disclaimer : Use this indicator at your own risk. Do proper back testing to make sure it works for you. I am not responsible for any losses you may have. Indicator may give false signals during consolidation state. Make sure to use other indicators for correct momentum or directional confirmations.
Bullish: Price is above the 5, 13, 20 EMAs AND the VWAP.
Bearish: Price is below the 5, 13, 20 EMAs AND the VWAP.
Cautious: This triggers when the "stack" is broken. For example, if you are in a clear uptrend but the price closes below the 5 EMA, the table will flip to Cautious to warn you of a potential slowdown.
Neutral: Used as a fallback if the price is chopping directly inside the EMA cluster.
Multi Cycles Predictive System ML - GBM IntegratedMulti-Cycle Predictive System: The Gradient Boosting Machine (GBM) Revolution
Introduction: The Death of Static Analysis
The financial markets are not static; they are a living, breathing, and chaotic system. Yet, for decades, traders have relied on static indicators—using the same RSI settings, the same MACD parameters, and the same Moving Averages regardless of whether the market is trending, chopping, or crashing.
The Multi-Cycle Predictive System (MCPS) represents a paradigm shift. It is not just an indicator; it is an Adaptive Machine Learning Engine running directly on your chart.
By integrating a fully functional Gradient Boosting Machine (GBM), this script does not guess—it learns. It monitors 13 distinct algorithmic models, calculates their real-time accuracy against future price action, and dynamically reallocates influence to the "winning" models using gradient descent.
This is Survival of the Fittest applied to technical analysis.
1. The Core Engine: Gradient Boosting & Adaptive Learning
At the heart of the MCPS is a custom-coded Gradient Boosting Machine. While most "ML" scripts on TradingView simply average a few indicators, this system replicates the architecture of advanced data science models.
How the GBM Works:
Ensemble Prediction: The system aggregates signals from 13 different mathematical models.
Residual Calculation: It compares the ensemble's previous predictions against the actual price movement (Price Return) to calculate the error (Residual).
Gradient Descent: It calculates the gradient of the loss function. We utilize a Huber Loss Gradient, which is robust against outliers (market spikes), ensuring the model doesn't overreact to volatility.
Weight Optimization: Using a configurable learning rate, the system updates the weights of each sub-algorithm. Models that predicted correctly gain weight; models that failed lose influence.
Softmax Normalization: Finally, weights are passed through a Softmax function (with Temperature control) to convert them into probabilities that sum to 1.0.
The "Winner-Takes-All" Philosophy
A common failure in ensemble systems is "Signal Dilution"—where good signals are drowned out by bad ones.
The MCPS solves this with Aggressive Weight Concentration:
Top 3 Logic: The script identifies the top 3 performing algorithms based on historical accuracy.
The 90% Rule: It forces the system to allocate up to 90% of the total decision weight to these top 3 performers.
Result: If Ehlers and Schaff are reading the market correctly, but MACD is failing, MACD is effectively silenced. The system listens only to the winners.
2. The 13 Algorithmic Pillars
The MCPS draws from a diverse library of Digital Signal Processing (DSP), Statistical, and Momentum algorithms. It does not rely on simple moving averages.
Ehlers Bandpass Filter: Isolates the dominant cycle in price data, removing trend and noise.
Zero-Lag EMA (ZLEMA): Reduces lag to near-zero to track momentum shifts instantly.
Coppock Curve: A classic long-term momentum indicator, modified here for adaptive responsiveness.
Detrended Price Oscillator (DPO): Eliminates the trend to identify short-term cycles.
Schaff Trend Cycle (STC): A double-smoothed stochastic of the MACD, excellent for identifying cycle turns.
Fisher Transform: Converts price into a Gaussian normal distribution to pinpoint turning points.
MESA Adaptive: Uses Maximum Entropy Spectral Analysis to detect the current dominant cycle period.
Goertzel Algorithm: A DSP technique used to identify the magnitude of specific frequency components in the price wave.
Hilbert Transform: Extracts the instantaneous amplitude and phase of the price action.
Autocorrelation: Measures the similarity between the price series and a lagged version of itself to detect periodicity.
Singular Spectrum Analysis (SSA): Decomposes the time series into trend, seasonal, and noise components (Simplified).
Wavelet Transform: Analyzes data at different scales (frequencies) simultaneously.
Empirical Mode Decomposition (EMD): Splits data into Intrinsic Mode Functions (IMFs) to isolate pure cycles.
3. The Dashboard: Total Transparency
Black-box algorithms are dangerous. You need to know why a signal is being generated. The MCPS features two detailed dashboards (tables) located at the bottom of your screen.
The Weight & Accuracy Table (Bottom Right)
This is your "Under the Hood" view. It displays:
Algorithm: The name of the model.
Accuracy: The rolling historical accuracy of that specific model over the lookback period (e.g., 58.2%).
Weight: The current influence that model has on the final signal. Watch this change in real-time. You will see the system "giving up" on bad models and "betting heavy" on good ones.
Prob/Sig: The raw probability and directional signal (Up/Down).
The GBM Stats Table (Bottom Left)
Tracks the health of the Machine Learning engine:
Iterations: How many learning cycles have occurred.
Entropy: A measure of market confusion. High entropy means weights are spread out (models disagree). Low entropy means the models are aligned.
Top 3 Weight: Shows how concentrated the decision power is. If this is >80%, the system is highly confident in specific models.
Confidence & Agreement: Statistical measures of the signal strength.
4. How to Trade with MCPS
This system outputs a single, composite Cycle Line (oscillating between -1 and 1) and a background Regime Color.
Strategy A: The Zero-Cross (Trend Reversal)
Bullish: When the Cycle Line crosses above 0. This indicates that the weighted average of the top-performing algorithms has shifted to a net-positive expectation.
Bearish: When the Cycle Line crosses below 0.
Strategy B: Probability Extremes (Mean Reversion)
Strong Buy: When the Cycle Line drops below -0.5 (Oversold) and turns up. This indicates a high-probability cycle bottom.
Strong Sell: When the Cycle Line rises above +0.5 (Overbought) and turns down.
Strategy C: Regime Filtering
The background color changes based on the aggregate consensus:
Green/Lime: Bullish Regime. Look primarily for Long entries. Ignore weak sell signals.
Red/Orange: Bearish Regime. Look primarily for Short entries.
Gray: Neutral/Choppy. Reduce position size or wait.
5. Configuration & GBM Settings
The script is highly customizable for advanced users who want to tune the Machine Learning hyperparameters.
Prediction Horizon: How many days into the future are we trying to predict? (Default: 3).
Accuracy Lookback: How far back does the model check to calculate "Accuracy"?
GBM Learning Rate: Controls how fast the model adapts.
High (0.2+): Adapts instantly to new market conditions but may be "jumpy."
Low (0.05): Very stable, long-term adaptation.
Temperature: Controls the "Softmax" function. Higher temperatures allow for softer, more distributed weights. Lower temperatures force a "Winner Takes All" outcome.
Max Top 3 Weight: The cap on how much power the top 3 models can hold (Default: 90%).
6. Technical Nuances (For the Geeks)
Huber Gradient: We use Huber loss rather than MSE (Mean Squared Error) for the gradient descent. This is crucial for financial time series because price spikes (outliers) can destroy the learning process of standard ML models. Huber loss transitions from quadratic to linear error, making the model robust.
Regularization: L2 Regularization is applied to prevent overfitting, ensuring the model doesn't just memorize past noise.
Memory Decay: The model has a "fading memory." Recent accuracy is weighted more heavily than accuracy from 200 bars ago, allowing the system to detect Regime Shifts (e.g., transitioning from a trending market to a ranging market).
Disclaimer:
This tool is a sophisticated analytical instrument, not a crystal ball. Machine Learning attempts to optimize probabilities based on historical patterns, but no algorithm can predict black swan events or fundamental news shocks. Always use proper risk management.
The "Warmup Period" is required. The script needs to process 50 bars of history before the GBM engine initializes and produces signals.
Author's Note:
I built the MCPS because I was tired of indicators that stopped working when the market "personality" changed. By integrating GBM, this script adapts to the market's personality in real-time. If the market is cycling, Ehlers and Goertzel take over. If the market is trending, Coppock and ZLEMA take the lead. You don't have to choose—the math chooses for you.
Please leave a boost and a comment if you find this helpful!
Ultimate Futures Daytrade Suite v1 - The Strategy GuideHere is the complete **Strategy Guide** translated into English.
---
# 📘 Ultimate Futures Daytrade Suite – The Strategy Guide
### 1. The Visual Legend (What is what?)
Before you trade, you need to understand the hierarchy of your lines. Not every line has the same importance.
* **🟣 Daily EMA 50 (Neon Violet):** The **"Big Boss"**. It determines the **Macro Trend**.
* *Price above:* We are primarily looking for Longs.
* *Price below:* We are primarily looking for Shorts.
* **🟢 4h EMA 50 (Neon Green):** The **"Swing Trend"**. Your most important level for **Pullback Entries** (Re-entries).
* **🟡 POC (Gold) & TPO:** The **"Magnet"**. Price often returns here.
* *Rule:* Never open a trade directly *on* the POC (Risk of "Chop"). Use it as a **Target** (Take Profit).
* **🟠 IB High/Low (Orange Lines):** The **"Daily Structure"**.
* A breakout from the IB (Initial Balance) often indicates the trend direction for the day.
* **🟥/🟩 Boxes (Supply/Demand):** Resistance and Support zones from the 1h timeframe.
* **⬜ FVG Boxes:** "Gaps" in the market that are often filled.
---
### 2. The Trading Workflow (Top-Down Method)
Go through this mental checklist before every trade:
#### Step 1: Trend Check (The Traffic Light)
Look at the **Violet Line (Daily)** and the **Green Line (4h)**.
* **Bullish:** Price is above Violet AND above Green. -> *Focus: Buy dips.*
* **Bearish:** Price is below Violet AND below Green. -> *Focus: Sell rallies.*
* **Mixed:** Price is between Violet and Green. -> *Caution! Market is undecided (Range Trading).*
#### Step 2: Location (The Context)
Where is the price currently located?
* Are we at a **Green Demand Zone**?
* Are we testing the **4h EMA 50 (Green)** from above?
* Are we at the **VWAP**?
* *Never trade in "No Man's Land"!* Wait until the price touches one of your lines.
#### Step 3: Trigger (The Execution)
Now zoom into your lower timeframe (e.g., 5min or 15min).
* Wait for a reaction at the zone.
* Use the **EMA 9 (Yellow)** as a momentum trigger. If price breaks the EMA 9 and closes above/below it, that is your "Go".
---
### 3. The Setup Blueprints
Here are the two most profitable scenarios you can trade with this script:
#### A) The "Golden Trend" Setup (Long)
* **Context:** Price > **Daily EMA (Violet)**.
* **Preparation:** Price corrects (drops) back to the **4h EMA 50 (Green)** or to the **VWAP**.
* **Confluence:** Ideally, there is also a **Demand Zone (Green Box)** or an **FVG** at that level.
* **Entry:** As soon as a candle touches the zone and closes bullish again (or reclaims the EMA 9).
* **Stop-Loss:** Below the 4h EMA 50.
* **Take-Profit:** Next **Supply Zone (Red)** or the **IB High (Orange)**.
#### B) The "Daytrade Breakout" (Intraday)
* **Context:** Price opens inside yesterday's Value Area.
* **Signal:** Price breaks through the **IB High (Orange)** with momentum.
* **Filter:** Price must be above the **VWAP**.
* **Entry:** On the retest of the IB High or directly on the breakout.
* **Target:** Price often trends in that direction for the rest of the day.
---
### 4. Warning Signals (When NOT to trade)
1. **The "Concrete Ceiling":** If you want to go Long, but the **Violet Daily EMA 50** is running directly above you. This is massive resistance. Better wait until it is broken.
2. **The "POC Dance":** If price is dancing sideways around the **Gold Line (POC)**. This is a "No-Trade Zone". Day traders lose the most money here due to fees and whipsaws.
3. **Overextension:** If price is extremely far away from the **4h EMA 50 (Green)** (Rubber Band Effect). Do not enter in the trend direction here; wait for a pullback to the line.
### Summary
Your chart is now telling you a story:
* **Violet** tells you the Direction.
* **Green** gives you the Entry.
* **Red/Green Boxes** show you the Obstacles.
* **Yellow (EMA 9)** gives you the Timing.
Good luck with the Suite! This is a setup similar to what institutional traders use.
RSI Divergence Pro Price Overlay High-Prob v6RSI Divergence Pro — Comprehensive Usage Guide
1) What This Indicator Does (in plain English)
Goal: Detect high-probability reversal (and optionally continuation) points using RSI divergences, then draw clean visual lines on price (red/bearish, green/bullish) and attach a % Strength label to help you quickly decide if it’s worth trading.
Core logic:
• Finds confirmed peaks and valleys using ta.pivothigh and ta.pivotlow.
• Bearish: Price makes Higher High while RSI makes Lower High.
• Bullish: Price makes Lower Low while RSI makes Higher Low.
• Filters for high probability: RSI near OB/OS, min RSI diff, ATR scaling, pivot spacing.
• Draws lines on price chart and attaches % Strength label.
• Alerts trigger only when a new divergence line is drawn.
2) Inputs & What Each One Means
• RSI Period: Shorter = more reactive; longer = smoother.
• Pivot Left/Right: Controls peak/valley confirmation.
• RSI Overbought/Oversold: Default 60/40; tighten for lower TFs.
• Min RSI Divergence: Minimum difference between RSI pivots.
• ATR Length & Min Price Move vs ATR: Ensures structural change.
• Bars Between Pivots: Avoid micro noise and stale signals.
• Hidden Divergence toggle: OFF for reversal; ON for continuation.
3) The % Strength Label — What It Represents
Combines RSI divergence magnitude (60%), Price move vs ATR (30%), OB/OS proximity (10%).
Interpretation:
• 80–100%: A-grade signals.
• 60–79%: Good, tradable with confirmation.
• 40–59%: Caution.
• <40%: Usually skip.
4) High-Probability Trading Workflow (H1)
1. Step 1: Scan & identify the signal.
2. Step 2: Confirm with price action (structure break or engulfing).
3. Step 3: Entry (conservative or aggressive).
4. Step 4: Stop placement (pivot ±0.5×ATR).
5. Step 5: Take profit & management (TP1 1×ATR, TP2 2×ATR, trail).
5) Confluence & Filters
• EMA slope confirmation.
• Structure alignment with S/R zones.
• Volatility regime check.
6) Example Scenarios
• A) Bearish Classic Divergence: HH price + LH RSI, Strength 83%.
• B) Bullish Classic Divergence: LL price + HL RSI, Strength 68%.
• C) Hidden Bullish Divergence: HL price + LL RSI, Strength 75%.
7) Common Pitfalls & How to Avoid Them
• Forcing signals in dead volatility.
• Taking divergences in strong trends without confirmation.
• Ignoring pivot spacing.
8) Tuning for Your Style
• H1 defaults: RSI 10, pivots 5/5, thresholds 60/40.
• M15/M5: thresholds 65/35, min RSI diff 10–12.
• H4/D1: thresholds 58/42, ATR multiple 0.4–0.6.
9) Multi-Asset Notes
• FX majors: overlap session ideal.
• Indices: require engulfing confirmation.
• Crypto: use ATR multiple ≥0.7.
10) Alerts — How to Use Them
• Set alerts Once per bar close.
• Alert names: Bearish RSI Divergence, Bullish RSI Divergence.
11) Backtesting & Forward Testing
• Define rules: entry, stop, TP.
• Track Strength % bins.
12) Troubleshooting & Diagnostics
• No lines? Loosen thresholds.
• Too many lines? Tighten thresholds.
13) Quick Operator’s Checklist
• Signal present?
• Location near S/R?
• Confirmation present?
14) Future Upgrade Options
• Session filter (London–NY overlap).
• EMA slope confirmation.
• Structure-break confirmation.
• Alert text enhancements.
Daily Floor PivotsDaily Floor Pivots with Comprehensive Statistical Analysis
Overview
This indicator combines traditional floor pivot levels with golden zone analysis and comprehensive statistical insights derived from 15 years of historical NQ futures data. While the pivot levels and golden zones can be applied to any instrument, the statistical tables are specifically calibrated for NQ/MNQ futures based on analysis of 2,482 NY Regular Trading Hours (RTH) sessions from 2010-2025.
What Makes This Indicator Original
Unlike standard pivot indicators that merely plot levels, this tool provides:
Enhanced Golden Zone Analysis: Calculates not only the main golden zone (0.5-0.618 retracement of previous day's range) but also golden zones between each pivot pair (PP-R1, R1-R2, R2-R3, PP-S1, S1-S2, S2-S3)
Data-Driven Statistical Tables: Two comprehensive tables displaying real statistics from 2,482 trading days of NQ analysis, including:
Probability-based touch rates and continuation patterns
Context-aware statistics based on opening position
Gap analysis and behavioral patterns
First touch dynamics and time-to-reach averages
Granular Customization: Every visual element and statistical section can be independently toggled, allowing traders to focus on what matters most to their strategy
How It Works
Pivot Calculation Methodology
The indicator uses the standard floor pivot formula based on the previous day's price action:
Pivot Point (PP) = (Previous High + Previous Low + Previous Close) / 3
Resistance Levels: R1, R2, R3 calculated from PP and previous range
Support Levels: S1, S2, S3 calculated from PP and previous range
Golden Zone Calculations
Main Golden Zone: The 0.5 to 0.618 Fibonacci retracement of the previous day's range, representing a key reversal and continuation area.
Inter-Pivot Golden Zones: For each adjacent pivot pair, golden zones are calculated as:
Resistance pairs (PP→R1, R1→R2, R2→R3): 0.5-0.618 range from the lower pivot
Support pairs (PP→S1, S1→S2, S2→S3): 0.382-0.5 range from the upper pivot
These zones represent high-probability areas where price tends to react when moving between pivot levels.
Statistical Analysis Source
All statistics displayed in the tables are derived from external Python analysis of 15 years of 1-minute NQ futures data (2010-2025), specifically analyzing NY RTH sessions (9:30 AM - 4:00 PM EST). The analysis tracked:
2,482 complete trading days
Intraday pivot touches and closes
Opening position context
Gap behavior relative to previous day
Time-of-day patterns
Sequential pivot interactions
IMPORTANT: While the pivot levels and golden zones are universally applicable mathematical calculations that work on any instrument, the statistical percentages shown in the tables are specific to NQ/MNQ behavior only. Do not assume these statistics transfer to other instruments.
Configuration Guide
Basic Settings
Number of Periods Back (1-20, default: 3)
Controls how many historical pivot periods are displayed on the chart
Setting to 1 shows only current day's pivots
Higher values show more historical context
Labels Position (Left/Right)
Choose whether pivot labels appear on the left or right side of each level line
Line Width (1-5, default: 2)
Adjust the thickness of all pivot and golden zone lines
Golden Zone Customization
Show Daily Golden Zone (0.5-0.618)
Toggle the main golden zone on/off
When enabled, displays a shaded box between the 0.5 and 0.618 retracement levels
Line Color / Fill Color
Customize the appearance of the main golden zone
Fill color determines the shaded box transparency
Show Labels / Show Prices
Control whether "0.5" and "0.618" labels appear
Control whether price values are displayed on labels
Inter-Pivot Golden Zones
Six toggle options allow you to show/hide individual golden zones:
PP to R1 / PP to S1: Most frequently touched (60.8% / 50.9%)
R1 to R2 / S1 to S2: Moderately touched (25.2% / 24.0%)
R2 to R3 / S2 to S3: Rarely touched (9.4% / 10.5%)
Line Color / Fill Color: Customize appearance of all inter-pivot zones
Show Labels / Show Prices: Control labeling for inter-pivot zones
Usage Tip: Disable outer zones (R2-R3, S2-S3) on lower volatility days to reduce chart clutter.
Pivot Display
Show Support/Resistance Levels: Master toggle for all pivot lines
Show SR Labels / Show SR Prices: Control labeling on pivot levels
Individual level toggles and colors:
PP (Pivot Point): The central reference point
R1/S1: Primary resistance/support (38.9% / 35.4% touch rate)
R2/S2: Secondary levels (15.6% / 16.1% touch rate)
R3/S3: Extended levels (5.1% / 7.3% touch rate)
Color Customization: Each level's color can be independently set
Overall Statistics Table
Show Overall Statistics Table: Master toggle
Table Size: tiny/small/normal/large/huge/auto
Table Position: Top Left/Top Right/Bottom Left/Bottom Right
Section Toggles (enable/disable individual sections):
Current Session Info
Touch & Close Rates
Continue & Reject Rates
First Touch Statistics
Golden Zone Statistics
Daily Close Distribution
Highest/Lowest Levels Reached
Context Statistics Table
Show Context Statistics Table: Master toggle
Table Size: tiny/small/normal/large/huge/auto
Table Position: Top Left/Top Right/Bottom Left/Bottom Right
Section Toggles:
Current Opening Zone
Opening Zone Statistics
Previous Day Gap Context
Understanding the Statistical Tables
TABLE 1: OVERALL STATISTICS
This table presents universal statistics from 2,482 days of NQ analysis.
Current Session Info
Displays real-time context for the active session:
Open: Where the current RTH session opened relative to pivots (e.g., "GZ_TO_R1" means opened between the PP-R1 golden zone and R1)
Now: Current price position relative to pivots
Direction: Bull (close > open), Bear (close < open), or Flat
How to use: This section helps you quickly understand where price opened and where it currently is, providing immediate context for the day's action.
Touch & Close Rates
Shows probability that each pivot level will be reached during RTH:
Touch %: Percentage of days where price touched this level at any point
Example: R1 touched 38.9% of days, PP touched 57.5% of days
Close %: Percentage of days where price closed beyond this level
Example: R1 close beyond happened 39.8% of days
How to interpret:
Higher touch rates indicate more reliable levels for intraday targeting
The difference between touch and close rates shows rejection frequency
PP has the highest touch rate (57.5%), making it the most magnetic level
Outer levels (R3/S3) have low touch rates (5.1%/7.3%), indicating rare extension days
Continue & Reject Rates
When a level is touched, these statistics show what happens next:
Continue %: Probability price continues through the level
Example: When PP is touched, price continues 88.1% of the time
Reject %: Probability price rejects from the level and reverses
Example: When R1 is touched, price rejects 50.9% of the time
How to interpret:
PP shows highest continuation (88.1%), confirming it's a poor reversal level
Support levels (S1/S2/S3) show strong rejection rates (62.5%/60.7%/56.1%), making them better reversal candidates
Continuation rates above 80% suggest the level is better as a target than an entry
First Touch Statistics
Analyzes which pivot is typically touched first during RTH:
1st Touch %: Probability this level is the first pivot encountered
PP is first touched 37.1% of days (most common)
R1 is first touched 26.0% of days
S1 is first touched 10.9% of days
1st→Continue: If this level is touched first, probability of continuation
S1-S3 show 95.6%-100% continuation when touched first
This means when price reaches support first, it usually continues lower
Avg Time: Minutes after 9:30 AM EST before first touch
PP: 1h 6m average
S3: 19m average (when bearish)
R3: 3h 19m average (when bullish)
How to interpret:
Opening away from PP means higher probability of reaching extremes (R2/R3 or S2/S3)
When support is touched first (within first 2 hours), expect continuation lower
Late-day first touches (after 2 PM) often indicate strong trending days
Multi-Touch: Shows how often levels are tested multiple times (92.8%-95.0% across all levels)
Golden Zone Statistics
Main GZ: 58.5% touch rate for the 0.5-0.618 zone
Inter-Pivot zones:
PP-R1: 60.8% (highest probability)
PP-S1: 50.9%
R1-R2: 25.2%
S1-S2: 24.0%
R2-R3: 9.4%
S2-S3: 10.5%
How to interpret:
Main GZ is touched more often than any individual resistance level
PP-R1 and PP-S1 golden zones are high-probability mean reversion areas
Outer golden zones (R2-R3, S2-S3) are only relevant on high volatility days
Daily Close Distribution
Shows where RTH sessions typically close:
Above/Below PP: 58.5% close above, 41.5% below (slight bullish bias)
Above R1: 24.5% of days
Below S1: 18.7% of days
In GZ: Only 6.3% close in the golden zone (typically transits through it)
How to interpret:
Most days (58.5%) have bullish bias (close above PP)
Less than 25% of days are strong trending days (beyond R1/S1)
Golden zone is an action area, not a resting area
Highest/Lowest Levels Reached
Distribution of the most extreme level reached:
High Resist: R1 (26.0%), R2 (10.8%), R3 (5.1%)
Low Support: S1 (35.4%), S2 (1.9%), S3 (0.6%)
How to interpret:
Most days don't reach beyond R1 or S1
R3/S3 are rare events (5.1%/0.6%), indicating major trending days
S1 is reached as lowest level more often than R1 as highest, suggesting downside is more frequently tested
TABLE 2: CONTEXT STATISTICS
This table provides conditional statistics based on how the session opened.
Current Opening Zone
Displays which of 13 possible zones the RTH session opened in:
ABOVE_R3, R2_TO_R3, R1_TO_R2, GZ_TO_R1, IN_GZ, PP_TO_GZ, AT_PP, GZ_TO_PP, S1_TO_GZ, S2_TO_S1, S3_TO_S2, BELOW_S3
How to use: This immediately tells you the market structure and what type of day to expect.
Opening Zone Statistics
Detailed statistics for the current opening zone (only shows for 6 major zones):
For each zone, you see:
Occurs: How often this opening scenario happens
GZ_TO_R1: 38.4% (most common)
AT_PP: 12.8%
S1_TO_GZ: 24.2%
R1_TO_R2: 9.4%
S2_TO_S1: 6.3%
IN_GZ: 3.8%
Bull/Bear %: Close direction probability
Example: GZ_TO_R1 is perfectly balanced (50.0% bull / 49.6% bear)
R1_TO_R2 is bullish (58.1% bull / 41.0% bear)
Levels Hit: Probability of reaching each pivot level from this opening
Helps identify high-probability targets
Example: From GZ_TO_R1, PP is hit 52.9%, R1 is hit 49.0%, S1 is hit 21.6%
How to interpret:
GZ_TO_R1 (most common): Balanced day, watch PP and GZ for direction clues
AT_PP: Slight bullish bias (56.9%), high chance of touching both PP (92.8%) and GZ (90.3%)
R1_TO_R2: Bullish bias (58.1%), expect continuation to R2 (58.1% chance)
S2_TO_S1: Bullish reversal setup (59.9%), very high chance of S1 touch (82.8%)
IN_GZ: Rare opening (3.8%), bullish bias, virtually guaranteed GZ touch (100%)
Previous Day Gap Context
Shows current gap scenario and typical behavior:
Three scenarios:
GAP UP: Opened Above Yesterday's High (20.5% of days)
R1 Touch: 65.9% (high probability)
R2 Touch: 42.1%
S1 Touch: 15.0% (low probability)
Bias: Bullish continuation
GAP DOWN: Opened Below Yesterday's Low (11.3% of days)
S1 Touch: 71.5% (high probability)
S2 Touch: 55.2%
R1 Touch: 12.1% (low probability)
Bias: Bearish continuation
NO GAP: Opened Within Yesterday's Range (68.2% of days)
PP Touch: 69.5%
GZ Touch: 71.7%
R1 Touch: 35.2%
Bias: Balanced (watch for direction at PP/GZ)
How to interpret:
Gap days (up or down) tend to continue in the gap direction
When gapping, fade trades are low probability (15.0% and 12.1%)
Most days (68.2%) open within previous range, making PP and GZ critical decision zones
The "bias" line provides clear directional guidance for trade selection
Practical Application Examples
Example 1: Standard Day Setup
Scenario: RTH opens at 20,450
PP: 20,400
GZ: 20,390-20,395
R1: 20,425
Previous day high: 20,460
What the tables tell you:
Opening Zone: "GZ_TO_R1" (38.4% occurrence)
Gap Context: "NO GAP" (68.2% occurrence)
Expected behavior: Balanced (50/50 bull/bear)
High probability: PP touch (52.9%), GZ touch (56.8%)
Moderate probability: R1 touch (49.0%), S1 touch (21.6%)
Trade plan:
Wait for price to reach PP (52.9% chance) or GZ (56.8% chance)
Look for directional confirmation at these levels
First target R1 if bullish, S1 if bearish
Avoid assuming direction without confirmation (perfectly balanced opening)
Example 2: Gap Up Day
Scenario: RTH opens at 20,510
Previous day high: 20,460
R1: 20,425
R2: 20,475
What the tables tell you:
Gap Context: "GAP UP" (20.5% occurrence)
R1 touch: 65.9% probability
R2 touch: 42.1% probability
S1 touch: Only 15.0% probability
Bias: Bullish continuation
Trade plan:
Favor long setups
Target R1 first (65.9% chance), then R2 (42.1%)
If R1 breaks, R2 becomes likely target
Shorting is low probability (only 15.0% reach S1)
Example 3: Opening in Golden Zone
Scenario: RTH opens at 20,393
PP: 20,400
GZ: 20,390-20,395
What the tables tell you:
Opening Zone: "IN_GZ" (rare, only 3.8% occurrence)
Bullish bias: 58.1%
GZ touch: 100% (guaranteed - already there)
PP touch: 75.3%
R1 touch: 41.9%
Trade plan:
Expect price to test PP (75.3% chance)
Slight bullish bias suggests long setups better than shorts
Watch how price reacts at PP - likely to continue to R1 (41.9%)
This is an uncommon opening, suggesting potential for larger moves
Best Practices
Match Your Instrument: Remember, statistics are NQ-specific. If trading other instruments, use the levels but disregard the statistical percentages.
Combine with Price Action: Use the statistics for probability context, not as standalone signals. Always confirm with price action, volume, and your trading methodology.
Adapt Table Display: Don't display all sections all the time. Toggle based on your trading phase:
Pre-market: Focus on "Gap Context" to understand the setup
Market open: Watch "Opening Zone Statistics" for directional bias
Intraday: Monitor "Current Session Info" for position tracking
Understand Context: A 60% touch rate doesn't mean guaranteed—it means 40% of days don't touch. Use these probabilities to size positions and manage expectations.
Inter-Pivot Golden Zones: These are most useful when price is already in motion toward a level. For example, if price breaks above PP heading to R1, the PP-R1 golden zone (60.8% touch rate) becomes a high-probability pullback area.
Time Awareness: The "Avg Time" statistics help you understand urgency. If it's 10:30 AM and S1 hasn't been touched (average is 55 minutes), the window for bearish moves is closing.
Technical Notes
Time Zone: All times referenced are NY/EST
Session Definition: RTH is 9:30 AM - 4:00 PM EST
Calculation Period: Pivots update daily based on previous 24-hour period (18:00 previous day to 17:00 current day)
Data Source: Statistics derived from 12 years of NQ 1-minute futures data (2013-2025)
Sample Size: 2,482 complete RTH trading sessions
Disclaimer
This indicator provides statistical probabilities based on historical NQ futures data. Past performance does not guarantee future results. The statistical tables are educational tools and should not be the sole basis for trading decisions. Always:
Use proper risk management
Combine with your own analysis
Understand that probabilities are not certainties
Remember that statistics are instrument-specific (NQ/MNQ only)
Credits
Statistical analysis performed using Python analysis of 12 years of historical NQ futures data. All pivot and golden zone calculations use standard mathematical formulas applicable to any instrument.
TurboRSI Pro [JOAT]TurboRSI Pro - Multi-Length RSI Ensemble with Dynamic Momentum Analysis
Introduction
TurboRSI Pro is an open-source indicator that reimagines the classic RSI by calculating multiple RSI lengths simultaneously and combining them into a single, more reliable momentum reading. Instead of relying on a single RSI period that may lag or produce false signals, this indicator creates an ensemble of RSI values across a configurable range, providing a smoother and more robust momentum assessment.
The indicator is designed for traders who want deeper insight into momentum conditions without the noise that comes from single-period oscillators.
Originality and Purpose
This indicator is NOT a simple RSI with different settings. It is an original implementation that solves a fundamental problem with traditional RSI:
The Problem with Single-Period RSI: Traditional RSI uses a single lookback period (typically 14). The issue is that different market conditions favor different RSI lengths. A 14-period RSI might work well in one market phase but produce false signals in another. There's no "perfect" RSI length that works in all conditions.
The Multi-Length Solution: TurboRSI Pro calculates RSI across a range of lengths (default: 10 to 20) simultaneously, then averages all values to create a composite reading. This ensemble approach filters out period-specific noise while preserving genuine momentum shifts. When multiple RSI lengths agree, the signal is more reliable.
OB/OS Strength Percentage: The indicator tracks how many individual RSI lengths are in overbought or oversold territory. When 100% of lengths are overbought, it's a much stronger signal than when only 50% are. This percentage-based approach is original to this indicator and provides conviction assessment.
Candle Heatmap Innovation: An optional feature colors price bars based on deviation from a 200-bar linear regression line. This shows when price is statistically overextended (HOT/COLD) independent of RSI, providing another layer of analysis.
How the components work together:
Multi-length RSI ensemble provides a more robust momentum reading than single-period RSI
OB/OS Strength percentages quantify how many timeframes agree on the momentum condition
Dynamic channels expand/contract based on momentum strength across all calculated lengths
Candle heatmap adds statistical price deviation context independent of RSI
Core Concept: Multi-Length RSI Ensemble
Traditional RSI uses a single lookback period (typically 14). The problem is that different market conditions favor different RSI lengths. TurboRSI Pro solves this by:
Calculating RSI across a range of lengths (default: 10 to 20)
Averaging all RSI values to create a composite reading
Tracking how many individual RSI lengths are in overbought or oversold territory
Displaying this information as "OB Strength" and "OS Strength" percentages
This approach filters out noise while preserving genuine momentum shifts.
How the Multi-Length RSI Works
The calculation uses an efficient array-based approach:
int N = maxLength - minLength + 1
float diff = nz(srcInput - srcInput )
for i = 0 to N - 1
int len = minLength + i
float alpha = 1.0 / len
float numRma = alpha * diff + (1 - alpha) * array.get(numArr, i)
float denRma = alpha * math.abs(diff) + (1 - alpha) * array.get(denArr, i)
float rsiVal = denRma != 0 ? 50 * numRma / denRma + 50 : 50
avgRSI += rsiVal
Each RSI length is calculated using the RMA (Running Moving Average) formula, then all values are averaged. The result is a composite RSI that responds to momentum changes while filtering out period-specific noise.
Visual Components
1. Multi-Length RSI Line
The main oscillator line displays the averaged RSI value with a gradient color:
Green gradient when RSI is above 50 (bullish momentum)
Red gradient when RSI is below 50 (bearish momentum)
Color intensity increases as RSI approaches extreme levels
2. Dynamic Channels
Two adaptive channel lines track momentum extremes:
Upper Channel: Expands when multiple RSI lengths enter overbought territory
Lower Channel: Expands when multiple RSI lengths enter oversold territory
Channel width indicates momentum strength across all calculated lengths
3. Candle Heatmap
An optional feature that colors price bars based on deviation from a linear regression line:
Red/Orange bars: Price is significantly above the regression line (overextended to upside)
Blue bars: Price is significantly below the regression line (overextended to downside)
Yellow bars: Price is near the regression line (neutral)
The heatmap uses a 200-bar regression calculation to identify when price has deviated significantly from its statistical trend.
4. Reference Lines
Standard RSI reference levels are displayed:
80 and 20: Extreme overbought/oversold
70 and 30: Standard overbought/oversold thresholds
50: Neutral momentum line
5. Background Zones
Shaded areas indicate the percentage of RSI lengths in extreme territory:
Green shading from bottom: Percentage of lengths in overbought
Red shading from top: Percentage of lengths in oversold
Dashboard Panel
The dashboard displays real-time analysis in a 7-row table:
RSI Value: Current composite RSI reading (large text for visibility)
Momentum: Current state - OVERBOUGHT, OVERSOLD, BULLISH, BEARISH, or NEUTRAL
OB Strength: Percentage of RSI lengths currently above the overbought threshold
OS Strength: Percentage of RSI lengths currently below the oversold threshold
Heat Level: Current price deviation state - HOT, WARM, NEUTRAL, COOL, or COLD
Trend Bias: Overall trend assessment based on RSI level and channel direction
Optional Stochastic RSI
When enabled, an additional Stochastic RSI line is plotted. This applies the stochastic formula to the RSI itself, providing another layer of momentum analysis. The Stochastic RSI is more sensitive to short-term momentum shifts.
Input Parameters
RSI Settings:
Min RSI Length: Starting length for the RSI range (default: 10)
Max RSI Length: Ending length for the RSI range (default: 20)
Source: Price source for calculation (default: ohlc4)
Overbought: Upper threshold (default: 70)
Oversold: Lower threshold (default: 30)
Candle Heatmap:
Enable Heatmap: Toggle bar coloring on/off (default: enabled)
Regression Length: Lookback for linear regression calculation (default: 200)
Display:
Show Dashboard: Toggle the information panel (default: enabled)
Show Dynamic Channels: Toggle channel lines (default: enabled)
Show Stochastic RSI: Toggle additional Stoch RSI line (default: disabled)
Colors:
Bullish: Color for bullish conditions (default: teal)
Bearish: Color for bearish conditions (default: red)
Neutral: Color for neutral conditions (default: gray)
How to Use TurboRSI Pro
Identifying Momentum Shifts:
Watch for RSI crossing above 50 for bullish momentum confirmation
Watch for RSI crossing below 50 for bearish momentum confirmation
Use the gradient color to quickly assess momentum direction
Using OB/OS Strength:
When OB Strength reaches 100%, all RSI lengths are overbought - strong reversal potential
When OS Strength reaches 100%, all RSI lengths are oversold - strong bounce potential
Partial readings (e.g., 50%) indicate mixed conditions across timeframes
Heatmap Analysis:
HOT readings combined with high RSI suggest overextension - caution for longs
COLD readings combined with low RSI suggest oversold conditions - watch for reversal
Use heatmap divergence from RSI for additional confirmation
Channel Interpretation:
Expanding upper channel with rising RSI confirms strong bullish momentum
Expanding lower channel with falling RSI confirms strong bearish momentum
Channel contraction suggests momentum is weakening
Alert Conditions
Six alert conditions are available:
RSI Overbought: RSI crosses above overbought threshold
RSI Oversold: RSI crosses below oversold threshold
RSI Bullish Cross: RSI crosses above 50
RSI Bearish Cross: RSI crosses below 50
All RSI Overbought: Every RSI length is in overbought territory
All RSI Oversold: Every RSI length is in oversold territory
Best Practices
Use on higher timeframes (1H, 4H, Daily) for more reliable signals
Combine with price action analysis - RSI confirms, it does not predict
Pay attention to OB/OS Strength percentages for conviction assessment
The heatmap works best on assets with clear trending behavior
Adjust min/max RSI lengths based on your trading style - wider range for smoother signals
Limitations
Like all oscillators, can remain in overbought/oversold territory during strong trends
The heatmap regression may lag during rapid price movements
Multi-length calculation requires more processing than single RSI
Best suited for swing trading and position trading timeframes
Technical Notes
This indicator is written in Pine Script v6 and uses:
Array-based calculations for efficient multi-length RSI computation
Linear regression for heatmap deviation analysis
Gradient coloring for intuitive visual feedback
State management for dynamic channel calculations
The source code is open and available for review and modification.
Disclaimer
This indicator is provided for educational and informational purposes only. It is not financial advice. Trading involves substantial risk of loss. Past performance does not guarantee future results. Always conduct your own analysis and use proper risk management.
-Made with passion by officialjackofalltrades
RSI Fibonacci Flow [JOAT]RSI Fibonacci Flow - Advanced Fibonacci Retracement with RSI Confluence
Introduction
RSI Fibonacci Flow is an open-source overlay indicator that combines automatic Fibonacci retracement levels with RSI momentum analysis to identify high-probability trading zones. The indicator automatically detects swing highs and lows, draws Fibonacci levels, and generates confluence signals when RSI conditions align with key Fibonacci zones.
This indicator is designed for traders who use Fibonacci retracements but want additional confirmation from momentum analysis before entering trades.
Originality and Purpose
This indicator is NOT a simple mashup of RSI and Fibonacci tools. It is an original implementation that creates a synergistic relationship between two complementary analysis methods:
Why Combine RSI with Fibonacci? Fibonacci retracements identify WHERE price might reverse, but they don't tell you WHEN. RSI provides the timing component by showing momentum exhaustion. When price reaches the Golden Zone (50%-61.8%) AND RSI shows oversold conditions, the probability of a successful bounce increases significantly.
Original Confluence Scoring System: The indicator calculates a 0-5 confluence score that weights multiple factors: Golden Zone presence (+2), entry zone presence (+1), RSI extreme alignment (+1), RSI divergence (+1), and strong RSI momentum (+1). This scoring system is original to this indicator.
Automatic Pivot Detection: Unlike manual Fibonacci tools, this indicator automatically detects swing highs and lows using a configurable pivot algorithm, then draws Fibonacci levels accordingly. The pivot detection uses a center-bar comparison method that checks if a bar's high/low is the highest/lowest within the specified depth on both sides.
Dynamic Trend Awareness: The indicator determines trend direction based on pivot sequence (last pivot was high or low) and adjusts Fibonacci orientation accordingly. In uptrends, 0% is at swing low; in downtrends, 0% is at swing high.
Each component serves a specific purpose:
Fibonacci levels identify potential reversal zones based on natural price ratios
RSI provides momentum context to filter out low-probability setups
Confluence scoring quantifies setup quality for position sizing decisions
Automatic pivot detection removes subjectivity from level placement
Core Concept: RSI-Fibonacci Confluence
The most powerful trading setups occur when multiple factors align. RSI Fibonacci Flow identifies these moments by:
Automatically detecting price pivots and drawing Fibonacci levels
Tracking which Fibonacci zone the current price occupies
Monitoring RSI for overbought/oversold conditions
Generating signals when RSI extremes coincide with key Fibonacci levels
Scoring confluence strength on a 0-5 scale
When price reaches the Golden Zone (50%-61.8%) while RSI shows oversold conditions in an uptrend, the probability of a bounce increases significantly.
Fibonacci Levels Explained
The indicator draws nine Fibonacci levels based on the most recent swing:
0% (Swing Low/High): The starting point of the move
23.6%: Shallow retracement - often seen in strong trends
38.2%: First significant support/resistance level
50%: Psychological midpoint of the move
61.8% (Golden Ratio): The most important Fibonacci level
78.6%: Deep retracement - last defense before trend failure
100% (Swing High/Low): The end point of the move
127.2% (TP1): First extension target for take profit
161.8% (TP2): Second extension target for take profit
The Golden Zone
The area between 50% and 61.8% is highlighted as the "Golden Zone" because:
It represents the optimal retracement depth for trend continuation
Institutional traders often place orders in this zone
It offers favorable risk-to-reward ratios
Price frequently bounces from this area in healthy trends
When price enters the Golden Zone, the indicator highlights it with a semi-transparent box and optional background coloring.
Pivot Detection System
The indicator uses a configurable pivot detection algorithm:
pivotDetect(float src, int len, bool isHigh) =>
int halfLen = len / 2
float centerVal = nz(src , src)
bool isPivot = true
for i = 0 to len - 1
if isHigh
if nz(src , src) > centerVal
isPivot := false
break
else
if nz(src , src) < centerVal
isPivot := false
break
isPivot ? centerVal : float(na)
This identifies swing highs and lows by checking if a bar's high/low is the highest/lowest within the specified depth on both sides.
Visual Components
1. Fibonacci Lines
Horizontal lines at each Fibonacci level:
Solid lines for major levels (0%, 50%, 61.8%, 100%)
Dashed lines for secondary levels (23.6%, 38.2%, 78.6%)
Dotted lines for extension levels (127.2%, 161.8%)
Color-coded for easy identification
Configurable line width
2. Fibonacci Labels
Price labels at each level showing:
Fibonacci percentage
Actual price at that level
Golden Zone label highlighted
TP1 and TP2 labels for targets
3. Golden Zone Box
A semi-transparent box highlighting the 50%-61.8% zone:
Gold colored border and fill
Extends from swing start to current bar (or beyond if extended)
Provides clear visual of the optimal entry zone
4. ZigZag Lines
Connecting lines between detected pivots:
Cyan for moves from low to high
Orange for moves from high to low
Helps visualize market structure
Configurable line width
5. Pivot Markers
Small labels at detected swing points:
"HH" (Higher High) at swing highs
"LL" (Lower Low) at swing lows
Helps track market structure
6. Entry Signals
BUY and SELL labels when confluence conditions are met:
BUY: RSI oversold + price in entry zone + uptrend + positive momentum
SELL: RSI overbought + price in entry zone + downtrend + negative momentum
Labels include "RSI+FIB" to indicate confluence
Confluence Scoring System
The indicator calculates a confluence score from 0 to 5:
+2 points: Price is in the Golden Zone (50%-61.8%)
+1 point: Price is in the entry zone (38.2%-61.8%)
+1 point: RSI is oversold in uptrend OR overbought in downtrend
+1 point: RSI divergence detected (bullish or bearish)
+1 point: Strong RSI momentum (change > 2 points)
Confluence ratings:
STRONG (4-5): Multiple factors align - high probability setup
MODERATE (2-3): Some factors align - proceed with caution
WEAK (0-1): Few factors align - wait for better setup
Dashboard Panel
The 10-row dashboard provides comprehensive analysis:
RSI Value: Current RSI reading (large text)
RSI State: OVERBOUGHT, OVERSOLD, BULLISH, BEARISH, or NEUTRAL
Fib Trend: UPTREND or DOWNTREND based on last pivot sequence
Price Zone: Current Fibonacci zone (e.g., "GOLDEN ZONE", "38.2% - 50%")
Price: Current close price (large text)
Confluence: Score rating with numeric value (e.g., "STRONG (4/5)")
Nearest Fib: Closest key Fibonacci level with price
TP1 (127.2%): First take profit target price
TP2 (161.8%): Second take profit target price
Input Parameters
Pivot Detection:
Pivot Depth: Bars to look back for swing detection (default: 10)
Min Deviation %: Minimum price move to confirm pivot (default: 1.0)
RSI Settings:
RSI Length: Period for RSI calculation (default: 14)
Source: Price source (default: close)
Overbought: Upper threshold (default: 70)
Oversold: Lower threshold (default: 30)
Fibonacci Display:
Show Fib Lines: Toggle Fibonacci lines (default: enabled)
Show Fib Labels: Toggle price labels (default: enabled)
Show Golden Zone Box: Toggle zone highlight (default: enabled)
Line Width: Thickness of Fibonacci lines (default: 2)
Extend Fib Lines: Extend lines into future (default: enabled)
ZigZag:
Show ZigZag: Toggle connecting lines (default: enabled)
ZigZag Width: Line thickness (default: 2)
Signals:
Show Entry Signals: Toggle BUY/SELL labels (default: enabled)
Show TP Levels: Toggle take profit in dashboard (default: enabled)
Show RSI-Fib Confluence: Toggle confluence analysis (default: enabled)
Dashboard:
Show Dashboard: Toggle information panel (default: enabled)
Position: Choose corner placement
Colors:
Bullish: Color for bullish elements (default: cyan)
Bearish: Color for bearish elements (default: orange)
Neutral: Color for neutral elements (default: gray)
Golden Zone: Color for Golden Zone highlight (default: gold)
How to Use RSI Fibonacci Flow
Identifying Entry Zones:
Wait for price to retrace to the 38.2%-61.8% zone
Check if RSI is approaching oversold (for longs) or overbought (for shorts)
Look for STRONG confluence rating in the dashboard
Enter when BUY or SELL signal appears
Setting Take Profit Targets:
TP1 at 127.2% extension for conservative target
TP2 at 161.8% extension for aggressive target
Consider scaling out at each level
Using the Price Zone:
"BELOW 23.6%" - Price hasn't retraced much; wait for deeper pullback
"23.6% - 38.2%" - Shallow retracement; strong trend continuation possible
"38.2% - 50%" - Good entry zone for trend trades
"GOLDEN ZONE" - Optimal entry zone; highest probability
"61.8% - 78.6%" - Deep retracement; trend may be weakening
"78.6% - 100%" - Very deep; trend reversal possible
"ABOVE/BELOW 100%" - Trend has likely reversed
Confluence Trading Strategy:
Only take trades with confluence score of 3 or higher
STRONG confluence (4-5) warrants larger position size
MODERATE confluence (2-3) warrants smaller position size
WEAK confluence (0-1) - wait for better setup
Alert Conditions
Ten alert conditions are available:
RSI-Fib BUY Signal: Strong bullish confluence detected
RSI-Fib SELL Signal: Strong bearish confluence detected
Price in Golden Zone: Price enters 50%-61.8% zone
New Pivot High: Swing high detected
New Pivot Low: Swing low detected
RSI Overbought: RSI crosses above overbought threshold
RSI Oversold: RSI crosses below oversold threshold
Bullish Divergence: Potential bullish RSI divergence
Bearish Divergence: Potential bearish RSI divergence
Strong Confluence: Confluence score reaches 4 or higher
Understanding Trend Direction
The indicator determines trend based on pivot sequence:
UPTREND: Last pivot was a low after a high (expecting move up)
DOWNTREND: Last pivot was a high after a low (expecting move down)
Fibonacci levels are drawn accordingly:
In uptrend: 0% at swing low, 100% at swing high
In downtrend: 0% at swing high, 100% at swing low
Bar Coloring
When confluence features are enabled:
Cyan bars on strong bullish signals
Orange bars on strong bearish signals
Gold-tinted bars when price is in Golden Zone
Best Practices
Use on 1H timeframe or higher for more reliable pivots
Adjust Pivot Depth based on timeframe (higher for longer timeframes)
Wait for price to enter Golden Zone before considering entries
Confirm RSI is in favorable territory before trading
Use extension levels (127.2%, 161.8%) for realistic profit targets
Combine with support/resistance and candlestick patterns
Higher confluence scores indicate higher probability setups
Limitations
Pivot detection has inherent lag (must wait for confirmation)
Fibonacci levels are subjective - different swings produce different levels
Works best in trending markets with clear swings
RSI can remain overbought/oversold in strong trends
Not all Golden Zone entries will be successful
The source code is open and available for review and modification.
Disclaimer
This indicator is provided for educational and informational purposes only. It is not financial advice. Trading involves substantial risk of loss. Past performance does not guarantee future results. Fibonacci levels are not guaranteed support/resistance - they are probability zones based on historical price behavior. Always conduct your own analysis and use proper risk management.
- Made with passion by officialjackofalltrades :D
Multi-timeframe RSI & Stochastic dashboard with visual gradient █ OVERVIEW
The MTF RSI + Stochastic Dashboard displays RSI and Stochastic values across 6 customizable timeframes in a compact, visual format. Instead of switching between charts or opening multiple indicator windows, see all your momentum data at a glance.
This indicator combines two of the most popular oscillators (RSI and Stochastic) and shows you where they agree—and where they don't.
█ FEATURES
- 6 Customizable Timeframes — Default: 1m, 5m, 15m, 1H, 4H, Daily (fully adjustable)
- Combined RSI + Stochastic Signal — Shows agreement between both indicators
- Visual Gradient Meters — Left side = Stochastic, Right side = RSI
- Color-Coded Status — OB (Overbought), OS (Oversold), Bull, Bear, S.Bull (Strong Bull), S.Bear (Strong Bear), Mixed
- Overall Trend Bias Bar — Shows percentage of timeframes bullish vs bearish
- Built-in Alerts — Trigger when all timeframes align or reach 80%+ agreement
- Fully Customizable — Colors, position, scale, spacing all adjustable
█ HOW TO READ IT
ROW 1 - TIMEFRAME
Shows which timeframe each column represents.
ROW 2 - COMBINED VALUE
The average of RSI and Stochastic for that timeframe. Color indicates the current state.
ROW 3 - STATUS
- OB = Both RSI and Stochastic overbought (>70/80)
- OS = Both RSI and Stochastic oversold (<30/20)
- Bull = Both indicators bullish (>50)
- Bear = Both indicators bearish (<50)
- S.Bull = Strong bullish (one OB, one Bull)
- S.Bear = Strong bearish (one OS, one Bear)
- Mixed = Indicators disagree
ROW 4 - GRADIENT METERS
Visual representation of RSI (right half) and Stochastic (left half) levels.
- Purple/Magenta = Overbought zone
- Green = Bullish zone
- Yellow/Orange = Neutral zone
- Red = Bearish zone
- Cyan = Oversold zone
BOTTOM BAR - TREND BIAS
Shows overall market bias based on all 6 timeframes.
- STRONG BULL = 70%+ timeframes bullish
- BULL = 55%+ timeframes bullish
- STRONG BEAR = 70%+ timeframes bearish
- BEAR = 55%+ timeframes bearish
- MIXED = No clear direction
█ HOW TO USE IT
CONFLUENCE TRADING
Look for multiple timeframes showing the same status. When 4+ timeframes agree, the signal is stronger.
DIVERGENCE SPOTTING
If lower timeframes show bearish while higher timeframes show bullish, price may be pulling back in an uptrend—potential buy opportunity.
OVERBOUGHT/OVERSOLD EXTREMES
When multiple timeframes hit OB or OS together, watch for potential reversals.
TREND CONFIRMATION
Use the bias bar to confirm your directional bias before entering trades.
█ SETTINGS
RSI Settings
- Length, Source, OB/OS levels
Stochastic Settings
- %K Length, %K Smoothing, %D Smoothing
- Choose to display %K or %D
- OB/OS/Mid/Zero levels
Timeframes
- 6 fully customizable slots
Layout
- Position offset, scale, box sizing, spacing
Colors
- Full control over all visual elements
█ ALERTS
- All Timeframes Bullish — Triggers when all 6 show bullish
- All Timeframes Bearish — Triggers when all 6 show bearish
- Strong Bullish Alignment — Triggers at 80%+ bullish
- Strong Bearish Alignment — Triggers at 80%+ bearish
█ BEST WAY TO DISPLAY THIS INDICATOR
For optimal viewing, follow these steps:
1. ADD THE INDICATOR
• Keep all settings at default — they're optimized for immediate use
2. SCALE YOUR CHART
• Right-click on the price scale (right side of chart)
• Select "Reset Price Scale" or double-click the price scale
• Use your mouse scroll wheel on the price scale to zoom OUT vertically
• This enlarges the indicator relative to the price action
3. POSITION ADJUSTMENT (if needed)
• Vertical Offset: Increase if indicator overlaps candles
• Horizontal Offset: Move left/right to your preference
• Overall Scale Size: Increase for larger display (default 2.0)
4. CHART SHIFT (recommended)
• Enable "Shift Chart" at the bottom-right of TradingView
• This gives the indicator room on the right side of your chart
PRO TIP: The indicator scales with your visible price range. Zoom out on the price scale (not the time scale) to make the dashboard larger and easier to read.
█ NOTES
- Non-repainting: Uses confirmed bar data for calculations
- Overlay indicator: Displays directly on your price chart
- Compatible with all markets and timeframes
- Free to use — part of the XRayTrade indicator collection
█ CREDITS
Developed by XRayTrade
BE-QuantFlow: Adaptive Momentum Trading█ Overview: QuantFlow: Adaptive Momentum Trading
QuantFlow is a sophisticated algorithmic momentum trading method designed specifically for indices and high-beta stocks. However, its logic is universal; with appropriate parameter tuning, it adapts to various asset classes and timeframes.
While the standard momentum indicators (like RSI or MACD) simply measure how fast price is moving (Velocity), QuantFlow analyzes the quality and conviction of the trend . Features like Dynamic Volatility Filtering and Trend Shielding, combined with volatility weighting and a "Dual-Line" approach to distinguish between a sustainable institutional trend and a temporary retail spike, make the indicator unique and more powerful.
█ Why QuantFlow ?
Quant (The Engine): This replaces subjective guessing with objective math.
Instead of just seeing that the price is "up," we measure "how it got there". For example, a stock that rises 1 currency value every day for 10 days (smooth trend) gets a much higher score than a stock that jumps 10 currency value in one minute and does nothing else (erratic noise). This mathematical rigor provides the structure.
█ Core Logic & Philosophy
To understand how QuantFlow calculates momentum, imagine a "Tug-of-War" between Buyers (Bulls) and Sellers (Bears). Most indicators (like RSI) use a single line. If RSI is at 50, it means "Neutral." But "Neutral" can mean two very different things:
Peace: Nothing is happening. No one is buying or selling.
War: Buyers are pushing hard, but Sellers are pushing back equally hard. Volatility is massive.
A single line hides this reality. QuantFlow splits the market into two separate scores:
Bull Score (Green Line): How hard are the buyers pushing?
Bear Score (Red Line): How hard are the sellers pushing?
The Layman's Advantage:
If both lines are low = Sleepy Market (Avoid).
If Green is high and Red is low = Clean Uptrend (Buy).
If Red is high and Green is low = Clean Downtrend (Sell).
If both lines are high = Chaos/War Zone (Wait).
█ How it Weight "Sustenance" (The Critical Quality Check)
This is the most unique aspect of QuantFlow: Trend direction alone is not enough; Sustenance is weighed equally . Standard indicators treat every 10 currency value movements the same way with no distinction. However, QuantFlow asks, "Did you hold the ground you gained?"
Scenario A (High Sustenance) : A stock opens at 100, marches to 110, and closes at 110.
Verdict : Buyers pushed up and sustained the price.
QuantFlow Weight : 100%. This is a high-quality move.
Scenario B (Low Sustenance) : A stock opens at 100, spikes to 110, but gets sold off to close at 102.
Verdict : Buyers pushed up (Trend is Up), but failed to sustain it (Long Wick).
QuantFlow Weight : 20%. This is treated as "Noise" or a trap.
By mathematically weighing the Close Location Value (where the candle closes relative to its high/low), QuantFlow filters out "Gap-and-Fade" traps and exhaustion spikes that fool traditional indicators.
Comparisons: QuantFlow vs. The Rest
Calculation Logic : Standard RSI/MACD measures simple price change over time. QuantFlow measures Price Change 'times (x)' Conviction (Sustenance Weighting).
Visual Output : Standard tools show a single line (0-100), often hiding market conflict. QuantFlow displays Dual Lines (Bull vs Bear Intensity) to reveal the true state of the battle.
Trap Handling : Standard indicators are often fooled by sharp spikes. QuantFlow ignores "Gap-and-Fade" moves with poor closing conviction.
Adaptability : Standard tools use static levels (e.g., Overbought > 70). QuantFlow uses Dynamic Bands that adjust automatically to recent volatility.
█ Dynamic Volatility Filtering
Unlike standard indicators that use fixed levels (e.g., "Buy if RSI > 50"), QuantFlow acknowledges that "50" means something different in a quiet market versus a crashing market. This section explains the statistical engine driving the signals.
The Problem with Static Levels : In a low-volatility environment, a momentum score of 55 might indicate a massive breakout. In a high-volatility environment, a score of 55 might just be random noise. A fixed threshold cannot handle both scenarios.
The Solution: Adaptive Statistics : The script maintains a memory of the Momentum Events. It doesn't just look at price; it looks at where the momentum occurred in the past and draws a "Noise Zone" (Grey Band). This logic acts as a "Smart Gatekeeper" for trade entries:
Scenario A: Inside the Noise (The Filter)
If a new momentum signal happens inside the Noise Zone, the script assumes it is likely chop or noise.
Action : It forces a wait period. The signal is delayed until the trend sustains itself for Confirm Bars; else the signal is cancelled. This filters out ~70% of false signals in sideways markets.
Scenario B: Outside the Noise (The Breakout)
If a new momentum signal happens outside the Noise Zone (or the momentum score smashes through the Upper Band), it is statistically significant (an outlier event).
Action: It triggers an Immediate Entry. No waiting is required because the move is powerful enough to escape the historical noise zone.
█ The ⚠️ "Warning" System (Heads-up for Smart Reversals)
While you are directional if there is potential reversal signal, it provides the heads-up warning for a better decision-making
█ Special Utility: Ghost Mode
For intraday traders, the biggest disruption to "Flow" is the mandatory broker square-off at 3:15 PM (considering Indian Market). Often, a trend continues overnight, and the trader misses the gap-up opening the next morning because their algo was flat.
Ghost Mode is a unique feature that runs silently in the background:
At Square-off: The strategy closes your official position to satisfy the broker.
In the Background: It keeps the trade "alive" virtually (Ghost).
Next Morning: If the market opens in the trend's favor, the strategy re-enters the trade automatically. This approach ensures you capture the full swing of the trend, even if you are forced to exit at the previous session.
█ Advice on this indicator:
Parameter Calibration: The default settings are optimized for BankNifty on 5-minute charts. If you trade stocks, crypto, commodities, or any higher timeframes (e.g., 15-min or hourly), you must adjust these.
Low Volatility Assets: Reduce Stop Multiplier to 2.0.
High Volatility Assets: Increase Momentum Lookback to 50 to filter noise.
Confluence (Additional Confirmation): While QuantFlow is a complete system, using it alongside Key Support/Resistance Levels or Volume Profile provides the highest probability setups.
Market Regime | NY Session Killzones Indicator [ApexLegion]Market Regime | NY Session Killzones Indicator
Introduction and Theoretical Background
The Market Regime | NY Session Killzones indicator is designed exclusively for New York market hours (07:00-16:00 ET). Unlike universal indicators that attempt to function across disparate global sessions, this tool employs session-specific calibration to target the distinct liquidity characteristics of the NY trading day: Pre-Market structural formation (08:00-09:30), the Morning breakout window (09:30-12:00), and the Afternoon Killzone (13:30-16:00)—periods when institutional order flow exhibits the highest concentration and most definable technical structure. By restricting its operational scope to these statistically significant time windows, the indicator focuses on signal relevance while filtering the noise inherent in lower-liquidity overnight or extended-hours trading environments.
I. TECHNICAL RATIONALE: THE PRINCIPLE OF CONTEXTUAL FUSION
1. The Limitation of Acontextual Indicators
Traditional technical indicators often fail because they treat every bar and every market session equally, applying static thresholds (e.g., RSI > 70) without regard for the underlying market structure or liquidity environment. However, institutional volume and market volatility are highly dependent on the time of day (session) and the prevailing long-term risk environment.
This indicator was developed to address this "contextual deficit" by fusing three distinct yet interdependent analytical layers:
• Time and Structure (Macro): Identifying high-probability trading windows (Killzones) and critical structural levels (Pre-Market Range, PDH/PDL).
• Volatility and Scoring (Engine): Normalizing intraday momentum against annual volatility data to create an objective, statistically grounded AI Score.
• Risk Management (Execution): Implementing dynamic, volatility-adjusted Stop Loss (SL) and Take Profit (TP) parameters based on the Average True Range (ATR).
2. The Mandate for 252-Day Normalization (Z-Score)
What makes this tool unique is its 252-day Z-Score normalization engine that transforms raw momentum readings into statistically grounded probability scores, allowing the same indicator to deliver consistent, context-aware signals across any timeframe—from 1-minute scalping to 1-hour swing trades—without manual recalibration.
THE PROBLEM OF SCALE INVARIANCE
A high Relative Strength Index (RSI) reading on a 1-minute chart has a completely different market implication than a high RSI reading on a Daily chart. Simple percentage-based thresholds (like 70 or 30) do not provide true contextual significance. A sudden spike in momentum may look extreme on a 5-minute chart, but if it is statistically insignificant compared to the overall volatility of the last year, it may be a poor signal.
THE SOLUTION: CROSS-TIMEFRAME Z-SCORE NORMALIZATION
This indicator utilizes the Pine Script function request.security to reference the Daily timeframe for calculating the mean (μ) and standard deviation (σ) of a momentum oscillator (RSI) over the past 252 trading days (one year).
The indicator then calculates the Z-Score (Z) for the current bar's raw momentum (x): Z = (x - μ) / σ
Core Implementation: float raw_rsi = ta.rsi(close, 14) // x
= request.security(syminfo.tickerid, "D",
, // σ (252 days)
lookahead=barmerge.lookahead_on)
float cur_rsi_norm = d_rsi_std != 0 ? (raw_rsi - d_rsi_mean) / d_rsi_std : 0.0 // Z
This score provides an objective measurement of current intraday momentum significance by evaluating its statistical extremity against the yearly baseline of daily momentum. This standardized approach provides the scoring engine with consistent, global contextual information, independent of the chart's current viewing timeframe.
II. CORE COMPONENTS AND TECHNICAL ANALYSIS BREAKDOWN
1. TIME AND SESSION ANALYSIS (KILLZONES AND BIAS)
The indicator visually segments the trading day based on New York (NY) trading sessions, aligning the analysis with periods of high institutional liquidity events.
Pre-Market (PRE)
• Function: Defines the range before the core market opens. This range establishes structural support and resistance levels (PMH/PML).
• Technical Implementation: Uses a dedicated Session input (ny_pre_sess). The High and Low values (pm_h_val/pm_l_val) within this session are stored and plotted for structural reference.
• Smart Extension Logic: PMH/PML lines are automatically extended until the next Pre-Market session begins, providing continuous support/resistance references overnight.
NY Killzones (AM/PM)
• Function: Highlights high-probability volatility windows where institutional liquidity is expected to be highest (e.g., NY open, lunch, NY close).
• Technical Implementation: Separate session inputs (kz_ny_am, kz_ny_pm) are utilized to draw translucent background fills, providing a clear visual cue for timing.
Market Regime Bias
• Function: Determines the initial directional premise for the trading day. The bias is confirmed when the price breaks either the Pre-Market High (PMH) or the Pre-Market Low (PML).
• Technical Implementation: Involves the comparison of the close price against the predefined structural levels (check_h for PMH, check_l for PML). The variable active_bias is set to Bullish or Bearish upon confirmed breakout.
Trend Bar Coloring
• Function: Applies a visual cue to the bars based on the established regime (Bullish=Cyan, Bearish=Red). This visual filter helps mitigate noise from counter-trend candles.
• Technical Implementation: The Pine Script barcolor() function is tied directly to the value of the determined active_bias.
2. VOLATILITY NORMALIZED SCORING ENGINE
The internal scoring mechanism accumulates points from multiple market factors to determine the strength and validity of a signal. The purpose is to apply a robust filtering mechanism before generating an entry.
The score accumulation logic is based on the following factors:
• Market Bias Alignment (+3 Points): Points are awarded for conformance with the determined active_bias (Bullish/Bearish).
• VWAP Alignment (+2 Points): Assesses the position of the current price relative to the Volume-Weighted Average Price (VWAP). Alignment suggests conformity with the average institutional transaction price.
• Volume Anomaly (+2 Points): Detects a price move accompanied by an abnormally high relative volume (odd_vol_spike). This suggests potential institutional participation or significant order flow.
• VIX Integration (+2 Points): A score derived from the CBOE VIX index, assessing overall market stability and stress. Stable VIX levels add points, while high VIX levels (stress regimes) remove points or prevent signal generation entirely.
• ML Probability Score (+3 Points): This is the core predictive engine. It utilizes a Log-Manhattan Distance Kernel to compare the current market state against historical volatility patterns. The script implements a Log-linear distance formula (log(1 + |Δ|) ). This approach mathematically dampens the impact of extreme volatility spikes (outliers), ensuring that the similarity score reflects true structural alignment rather than transient market noise.
Core Technical Logic (Z-Score Normalization)
float cur_rsi_norm = d_rsi_std != 0 ? (raw_rsi - d_rsi_mean) / d_rsi_std : 0.0
• Technical Purpose: This line calculates the Z-Score (cur_rsi_norm) of the current momentum oscillator reading (raw_rsi) by normalizing it against the mean (d_rsi_mean) and standard deviation (d_rsi_std) derived from 252 days of Daily momentum data. If the standard deviation is zero (market is perfectly flat), it safely returns 0.0 to prevent division by zero runtime errors. This allows the AI's probability score to be based on the current signal's significance within the context of the entire trading year.
3. EXECUTION AND RISK MANAGEMENT (ATR MODEL)
The indicator utilizes the Average True Range (ATR) volatility model. This helps risk management scale dynamically with market volatility by allowing users to define TP/SL distances independently based on the current ATR.
Stop Loss Multiplier (sl_mult)
• Function: Sets the Stop Loss (SL) distance as a configurable multiple of the current ATR (e.g., 1.5 × ATR).
• Technical Logic: The price level is calculated as: last_sl_price := close - (atr_val * sl_mult). The mathematical sign is reversed for short trades.
Take Profit Multiplier (tp_mult)
• Function: Sets the Take Profit (TP) distance as a configurable multiple of the current ATR (e.g., 3.0 × ATR).
• Technical Logic: The price level is calculated as: last_tp_price := close + (atr_val * tp_mult). The mathematical sign is reversed for short trades.
Structural SL Option
• Function: Provides an override to the ATR-based SL calculation. When enabled, it forces the Stop Loss to the Pre-Market High/Low (PMH/PML) level, aligning the stop with a key institutional structural boundary.
• Technical Logic: The indicator checks the use_struct_sl input. If true, the calculated last_sl_price is overridden with either pm_h_val or pm_l_val, dependent on the specific trade direction.
Trend Continuation Logic
• Function: Enables signal generation in established, strong trends (typically in the Afternoon session) based on follow-through momentum (a new high/low of the previous bar) combined with a high Signal Score, rather than exclusively relying on the initial PMH/PML breakout.
• Technical Logic: For a long signal, the is_cont_long logic specifically requires checks like active_bias == s_bull AND close > high , confirming follow-through momentum within the established regime.
Smart Snapping & Cleanup (16:00 Market Close)
• Function: To maintain chart cleanliness, all trade boxes (TP/SL), AI Prediction zones, Killzone overlays (NY AM/PM), and Liquidity lines (PDH/PDL) are automatically "snapped" and cut off precisely at 16:00 NY Time (Market Close).
• Technical Logic: When is_market_close condition is met (hour == 16 and minute == 0), the script executes cleanup logic that:
◦ Closes active trades and evaluates final P&L
◦ Snaps all TP/SL box widths to current bar
◦ Truncates AI Prediction ghost boxes at market close
◦ Cuts off NY AM/PM Killzone background fills
◦ Terminates PDH/PDL line extensions
◦ Prevents visual clutter from extending into post-market sessions
4. LIQUIDITY AND STRUCTURAL ANALYSIS
The indicator plots key structural levels that serve as high-probability magnet zones or areas of potential liquidity absorption.
• Pre-Market High/Low (PMH/PML): These are the high and low established during the configured pre-market session (ny_pre_sess). They define the primary structural breakout level for the day, often serving as the initial market inflection point or the key entry level for the morning session.
• PDH (Previous Day High): The high of the calendar day immediately preceding the current bar. This represents a key Liquidity Pool; large orders are often placed above this level, making it a frequent target for stop hunts or liquidity absorption by market makers.
• PDL (Previous Day Low): The low of the calendar day immediately preceding the current bar. This also represents a key Liquidity Pool and a high-probability reversal or accumulation point, particularly during the Killzones.
FIFO Array Management
The indicator uses FIFO (First-In-First-Out) array structures to manage liquidity lines and labels, automatically deleting the oldest objects when the count exceeds 500 to comply with drawing object limits.
5. AI PREDICTION BOX (PREDICTIVE MODEL)
Function: Analyzes AI scores and volatility to project predicted killzone ranges and duration with asymmetric directional bias.
A. DIRECTIONAL BIAS (ASYMMETRIC EXPANSION)
The prediction model calculates directional probability using the ML kernel's 252-day Normalized RSI (Z-Score) and Relative Volume (RVOL). The prediction box dynamically adjusts its range based on this probability to provide immediate visual feedback on high-probability direction.
Bullish Scenario (ml_prob > 1.0):
• Upper Range: Expands significantly (1.5x multiplier) to show the aggressive upside target
• Lower Range: Tightens (0.5x multiplier) to show the invalidation level
• Visual Intent: The box is visibly skewed upward, immediately communicating bullish bias without requiring numerical analysis.
Bearish Scenario (ml_prob < -1.0):
• Upper Range: Tightens (0.5x multiplier) to show the invalidation level
• Lower Range: Expands significantly (1.5x multiplier) to show the aggressive downside target
• Visual Intent: The box is visibly skewed downward, immediately communicating bearish bias.
Neutral Scenario (-1.0 < ml_prob < 1.0):
Both ranges use balanced multipliers, creating a symmetrical box that indicates uncertainty.
B. DYNAMIC VOLATILITY BOOSTER (SESSION-BASED ADAPTATION)
The prediction box adjusts its volatility multiplier based on the current session and market conditions to account for intraday volatility patterns.
AM Session (Morning: 07:00-12:00):
• Base Multiplier: 1.0x (Neutral Base)
• Logic: Morning sessions often contain false breakouts and noise. The base multiplier starts neutral to avoid over-projecting during consolidation.
• Trend Booster: Multiplier jumps to 1.5x when:
Price > London Session Open AND AI is Bullish (ml_prob > 0), OR
Price < London Session Open AND AI is Bearish (ml_prob < 0)
• Logic: When the London trend (typically 03:00-08:00 NY time) aligns with the AI model's directional conviction, the indicator aggressively targets higher volatility expansion. This filters for "institutional follow-through" rather than random morning chop.
PM Session (Afternoon: 13:00-16:00):
• Fixed Multiplier: 1.8x
• Logic: The PM session, particularly the 13:30-16:00 ICT Silver Bullet window, often contains the "True Move" of the day. A higher baseline multiplier is applied to emphasize this session's significance over morning noise.
Safety Floor:
A minimum range of 0.2% of the current price is enforced regardless of volatility conditions.
• Purpose: Maintains the prediction box visibility during extreme low-volatility consolidation periods where ATR might collapse to near-zero values.
Volatility Clamp Protection:
Maximum volatility is capped at three times the current ATR value. During flash crashes, circuit breaker halts, or large overnight gaps, raw volatility calculations can spike to extreme levels. This clamp prevents prediction boxes from expanding to unrealistic widths.
Technical Implementation:
f_get_ai_multipliers(float _prob) =>
float _abs_prob = math.abs(_prob)
float _range_mult = 1.0
float _dur_mult = 1.0
if _abs_prob > 30
_range_mult := 1.8
else if _abs_prob > 10
_range_mult := 1.2
else
_range_mult := 0.7
C. PRACTICAL INTERPRETATION
• Wide Upper Range + Tight Lower Range: Strong bullish conviction. The model expects significant upside with limited downside risk.
• Tight Upper Range + Wide Lower Range: Strong bearish conviction. The model expects significant downside with limited upside.
• Symmetrical Range: Neutral/uncertain market. Wait for directional confirmation before entry.
• Large Box (Extended Duration): High-confidence prediction expecting sustained movement.
• Small Box (Short Duration): Low-confidence or choppy conditions. Expect quick resolution.
III. PRACTICAL USAGE GUIDE: METHODOLOGY AND EXECUTION
A. ESTABLISHING TRADING CONTEXT (THE THREE CHECKS)
The primary goal of the dashboard is to filter out low-probability trade setups before they occur.
• Timeframe Selection: Although the core AI is normalized to the Daily context, the indicator performs optimally on intraday timeframes (e.g., 5m, 15m) where session-based volatility is most pronounced.
• PHASE Check (Timing): Always confirm the current phase. The highest probability signals typically occur within the visually highlighted NY AM/PM Killzones because this is when institutional liquidity and volume are at their peak. Signals outside these zones should be treated with skepticism.
• MARKET REGIME Check (Bias): Ensure the signal (BUY/SELL arrow) aligns with the established MARKET REGIME bias (BULLISH/BEARISH). Counter-bias signals are technically allowed if the score is high, but they represent a higher risk trade.
• VIX REGIME Check (Risk): Review the VIX REGIME for overall market stress. Periods marked DANGER (high VIX) indicate elevated volatility and market uncertainty. During DANGER regimes, reducing position size or choosing a wider SL Multiplier is advisable.
B. DASHBOARD INTERPRETATION (THE REAL-TIME STATUS DISPLAY)
The indicator features a non-intrusive dashboard that provides real-time, context-aware information based on the core analytical engines.
PHASE: (PRE-MARKET, NY-AM, LUNCH, NY-PM)
• Meaning: Indicates the current institutional session time. This is derived from the customizable session inputs.
• Interpretation: Signals generated during NY-AM or NY-PM (Killzones) are generally considered higher-probability due to increased institutional participation and liquidity.
MARKET REGIME: (BULLISH, BEARISH, NEUTRAL)
• Meaning: The established directional bias for the trading day, confirmed by the price breaking above the Pre-Market High (PMH) or below the Pre-Market Low (PML).
• Interpretation: Trading with the established regime (e.g., taking a BUY signal when the regime is BULLISH) is the primary method. NEUTRAL indicates that the PMH/PML boundary has not yet been broken, suggesting market ambiguity.
VIX REGIME: (STABLE, DANGER)
• Meaning: A measure of overall market stress and stability, based on the CBOE VIX index integration. The thresholds (20.0 and 35.0 default) are customizable by the user.
• Interpretation: STABLE indicates stable volatility, favoring momentum trades. DANGER (VIX > 35.0) indicates extreme stress; signals generated in this environment require caution and often necessitate smaller position sizing.
SIGNAL SCORE: (0 to 10+ Points)
• Meaning: The accumulated score derived from the VOLATILITY NORMALIZED AI SCORING ENGINE, factoring in bias, VWAP alignment, volume, and the Z-Score probability.
• Interpretation: The indicator generates a signal when this score meets or exceeds the Minimum Entry Score (default 3). A higher score (e.g., 7+) indicates greater statistical confluence and a stronger potential entry.
AI PROBABILITY: (Bull/Bear %)
• Meaning: Directional probability derived from the ML kernel, expressed as a percentage with Bull/Bear label.
• Interpretation: Higher absolute values (>20%) indicate stronger directional conviction from the ML model.
LIVE METRICS SECTION:
• STATUS: Shows current trade state (LONG, SHORT, or INACTIVE)
• ENTRY: Displays the entry price for active trades
• TARGET: Shows the calculated Take Profit level
• ROI | KILL ZONE:
◦ For Active Trades: Displays real-time P&L percentage during NY session hours.
◦ At Market Close (16:00 NY): Since this is a NY session-specific indicator, any active position is automatically evaluated and closed at 16:00. The final result (VALIDATED or INVALIDATED) is determined based on whether the trade reached profit or loss at market close.
◦ Result Persistence: The killzone result (VALIDATED/INVALIDATED) remains displayed on the dashboard until the next NY AM KILLZONE session begins, providing a clear performance reference for the previous trading day.
Note: If a trade is still trending at 16:00, it will be force-closed and evaluated at that moment, as the indicator operates strictly within NY trading hours.
C. SIGNAL GENERATION AND ENTRY LOGIC
The indicator generates signals based on two distinct technical setups, both of which require the accumulated SIGNAL SCORE to be above the configured Minimum Entry Score.
Breakout Entry
• Trigger Condition: Price closes beyond the Pre-Market High (PMH) or Low (PML).
• Rationale: This setup targets the initial directional movement for the day. A breakout confirms the institutional bias by decisively breaking the first major structural boundary, making the signal high-probability.
Continuation Entry
• Trigger Condition: The market is already in an established regime (e.g., BULLISH), and the price closes above the high (or below the low) of the previous bar, while the SIGNAL SCORE remains high. Requires the Allow Trend Continuation parameter to be active.
• Rationale: This setup targets follow-through trades, typically in the afternoon session, capturing momentum after the morning's direction has been confirmed. This filters for sustainability in the established trend.
Execution: Execute the trade immediately upon the close of the bar that prints the BUY or SELL signal arrow.
D. MANAGING RISK AND EXITS
1. RISK PARAMETER SELECTION
The indicator immediately draws the dynamic TP/SL zones upon entry.
• Volatility-Based (Recommended Default): By setting the SL Multiplier (e.g., 1.5) and the TP Multiplier (e.g., 3.0), the indicator enforces a constant, dynamically sized risk-to-reward ratio (e.g., 1:2 in this example). This helps that risk management scales proportionally with the current market volatility (ATR).
• Structural Override: Selecting the Use Structural SL parameter fixes the stop-loss not to the ATR calculation, but to the more significant structural level of the PMH or PML. This is utilized by traders who favor institutional entry rules where the stop is placed behind the liquidity boundary.
2. EXIT METHODS
• Hard Exit: Price hits the visual TP or SL box boundary.
• Soft Exit (Momentum Decay Filter): If the trade is active and the SIGNAL SCORE drops below the Exit Score Threshold (default 3), it indicates that the momentum supporting the trade has significantly collapsed. This serves as a momentum decay filter, prompting the user to consider a manual early exit even if the SL/TP levels have not been hit, thereby preserving capital during low-momentum consolidation.
• Market Close Auto-Exit: At 16:00 NY time, any active trade is automatically closed and classified as VALIDATED (profit) or INVALIDATED (loss) based on current price vs. entry price.
IV. PARAMETER REFERENCE AND CONFIGURATION
A. GLOBAL SETTINGS
• Language (String, Default: English): Selects the language for the dashboard and notification text. Options: English, Korean, Chinese, Spanish, Portuguese, Russian, Ukrainian, Vietnamese.
B. SESSION TIMES (3 BOX SYSTEM)
• PRE-MARKET (Session, Default: 0800-0930): Defines the session range used for Pre-Market High/Low (PMH/PML) structural calculation.
• REGULAR (Morning) (Session, Default: 0930-1200): Defines the core Morning trading session.
• AFTERNOON (PM) (Session, Default: 1300-1600): Defines the main Afternoon trading session.
• Timezone (String, Default: America/New_York): Sets the timezone for all session and time-based calculations.
C. NY KILLZONES (OVERLAYS)
• Show NY Killzones (Bool, Default: True): Toggles the translucent background fills that highlight high-probability trading times (Killzones).
• NY AM Killzone (Session, Default: 0700-1000): Defines the specific time window for the first key liquidity surge (Open overlap).
• NY PM Killzone (Session, Default: 1330-1600): Defines the afternoon liquidity window, aligned with the ICT Silver Bullet and PM Trend entry timing.
• Allow Entry in Killzones (Bool, Default: True): Enables or disables signal generation specifically during the defined Killzone hours.
• Activate AI Prediction Box (Bool, Default: True): Toggles the drawing of the predicted target range boxes on the chart.
D. CORE SCORING ENGINE
• Minimum Entry Score (Int, Default: 3): The lowest accumulated score required for a Buy/Sell signal to be generated and plotted.
• Allow Trend Continuation (Bool, Default: True): Enables the secondary entry logic that fires signals based on momentum in an established trend.
• Force Ignore Volume (Bool, Default: False): Overrides the volume checks in the scoring engine. Useful for markets where volume data is unreliable or nonexistent.
• Force Show Signals (Ignore Score) (Bool, Default: False): Debug mode that displays all signals regardless of score threshold.
• Integrate CBOE:VIX (Bool, Default: True): Enables the connection to the VIX index for market stress assessment.
• Stable VIX (<) (Float, Default: 20.0): VIX level below which market stress is considered low (increases score).
• Stress VIX (>) (Float, Default: 35.0): VIX level above which market stress is considered high (decreases score/flags DANGER).
• Use ML Probability (Bool, Default: True): Activates the volatility-normalized AI Z-Score kernel. Disabling this removes the cross-timeframe normalization filter.
• Max Learning History (Int, Default: 2000): Maximum number of bars stored in the ML training arrays.
• Normalization Lookback (252 Days) (Int, Default: 252): The number of DAILY bars used to calculate the Z-Score mean and standard deviation (representing approximately 1 year of data).
E. RISK MANAGEMENT (ATR MODEL)
• Use Structural SL (Bool, Default: False): Overrides the ATR-based Stop Loss distance to use the Pre-Market High/Low as the fixed stop level.
• Stop Loss Multiplier (x ATR) (Float, Default: 1.5): Defines the Stop Loss distance in multiples of the current Average True Range (ATR).
• Take Profit Multiplier (x ATR) (Float, Default: 3.0): Defines the Take Profit distance in multiples of the current Average True Range (ATR).
• Exit Score Threshold (<) (Int, Default: 3): The minimum score below which an active trade is flagged for a Soft Exit due to momentum collapse.
F. VISUAL SETTINGS
• Show Dashboard (Bool, Default: True): Toggles the real-time data panel.
• Show NY Killzones (Bool, Default: True): Toggles killzone background fills.
• Show TP/SL Zones (Bool, Default: True): Toggles the drawing of Take Profit and Stop Loss boxes.
• Show Pre-Market Extensions (Bool, Default: True): Extends PM High/Low lines across the entire chart for support/resistance reference.
• Activate AI Prediction Box (Bool, Default: True): Enable or disable the predictive range projection.
• Light Mode Optimization (Bool, Default: True): Toggles dashboard and plot colors for optimal visibility on white (light) chart backgrounds.
• Enforce Trend Coloring (Bool, Default: True): Forces candle colors based on Market Regime (Bullish=Cyan, Bearish=Pink) to emphasize trend direction.
• Label Size (String, Default: Normal): Options: Tiny, Small, Normal.
G. LIQUIDITY POOLS (PDH/PDL)
• Show Liquidity Lines (Bool, Default: True): Toggles the display of the Previous Day High (PDH) and Low (PDL) lines.
• Liquidity High Color (Color, Default: Green): Color setting for the PDH line.
• Liquidity Low Color (Color, Default: Red): Color setting for the PDL line.
🔔 ALERT CONFIGURATION GUIDE
The indicator is equipped with specific alert conditions.
How to Set Up an Alert:
Click the "Alert" (Clock icon) in the top TradingView toolbar.
Select "Market Regime NY Session " from the Condition dropdown menu.
Choose one of the specific trigger conditions below depending on your strategy:
🚀 Available Alert Conditions
1. BUY (Long Entry)
Trigger: Fires immediately when a confirmed Bullish Setup is detected.
Conditions: Market Bias is Bullish (or valid Continuation) + Signal Score ≥ Minimum Entry Score.
Usage: Use this alert to open new Long positions or close existing Short positions.
2. SELL (Short Entry)
Trigger: Fires immediately when a confirmed Bearish Setup is detected.
Conditions: Market Bias is Bearish (or valid Continuation) + Signal Score ≥ Minimum Entry Score.
Usage: Use this alert to open new Short positions or close existing Long positions.
V. IMPORTANT TECHNICAL LIMITATIONS
⚠️ Intraday Only (Timeframe Compatibility)
This indicator is strictly designed for Intraday Timeframes (1m to 4h).
Daily/Weekly Charts: The session logic (e.g., "09:30-16:00") cannot function on Daily bars because a single bar encompasses the entire session. Session boxes, TP/SL zones, and AI prediction boxes will NOT draw on the Daily timeframe. Only the PDH/PDL liquidity lines remain visible on Daily charts. This is expected behavior, not a limitation.
Maximum Supported Timeframe: All visual components (session boxes, killzone overlays, TP/SL zones, AI prediction boxes) are displayed up to the 4-hour timeframe. Above this timeframe, only PDH/PDL lines and the dashboard remain functional.
⚠️ Drawing Object Limit (Max 500)
A single script can display a maximum of 500 drawing objects (boxes/lines) simultaneously.
On lower timeframes (e.g., 1-minute), where many signals and session boxes are generated, older history (typically beyond 10-14 days) will automatically disappear to make room for new real-time data.
For deeper historical backtesting visualization, switch to higher timeframes (e.g., 15m, 1h).
The indicator implements FIFO array management to comply with this limit while maintaining the most recent and relevant visual data.
VI. PRACTICAL TRADING TIPS AND BEST PRACTICES
• Killzone Confirmation: The highest statistical validity is observed when a high-score signal occurs directly within a visible NY AM/PM Killzone. Use the Killzones as a strict time filter.
• Liquidity Awareness (PDH/PDL): Treat the Previous Day High (PDH) and Low (PDL) lines as magnets. If your dynamic Take Profit (TP) is placed just above PDH, consider adjusting your target slightly below PDH or utilizing the Soft Exit, as liquidity absorption at these levels often results in sudden, sharp reversals that stop out a trade just before the target is reached.
• VIX as a Position Sizer: During DANGER VIX regimes, the resulting high volatility means the ATR value will be large. It is prudent to either reduce the SL Multiplier or, more commonly, reduce the overall position size to maintain a constant currency risk exposure per trade.
• Continuation Filter Timing: Trend Continuation signals are most effective during the Afternoon (PM) session when the morning's directional breakout has had time to establish a strong, clear, and sustainable trend. Avoid using them in the initial AM session when the direction is still being contested.
• 16:00 Market Close Rule: All trades, boxes, and lines are automatically cleaned up at 16:00 NY time. This prevents overnight chart clutter and maintains visual clarity.
VII. DISCLAIMER & RISK WARNINGS
• Educational Purpose Only
This indicator, including all associated code, documentation, and visual outputs, is provided strictly for educational and informational purposes. It does not constitute financial advice, investment recommendations, or a solicitation to buy or sell any financial instruments.
• No Guarantee of Performance
Past performance is not indicative of future results. All metrics displayed on the dashboard (including "ROI" and trade results) are theoretical calculations based on historical data. These figures do not account for real-world trading factors such as slippage, liquidity gaps, spread costs, or broker commissions.
• High-Risk Warning
Trading cryptocurrencies, futures, and leveraged financial products involves a substantial risk of loss. The use of leverage can amplify both gains and losses. Users acknowledge that they are solely responsible for their trading decisions and should conduct independent due diligence before executing any trades.
• Software Limitations
The software is provided "as is" without warranty. Users should be aware that market data feeds on analysis platforms may experience latency or outages, which can affect signal generation accuracy.
Asian Stop Hunt ModelSTOP HUNT MODEL – STRATEGY DESCRIPTION
The Stop Hunt Model is designed to capture high-probability trades by targeting stop-loss liquidity from retail traders at buy-side and sell-side liquidity zones. The strategy focuses on identifying where liquidity is taken during the Asian session, waiting for a Change of Character (CHoCH), and then entering from unfilled orders (Balanced Price Range / Imbalance) in the direction of the dominant IPDA bias. The objective is to trade from engineered liquidity sweeps toward the next logical liquidity pool, while maintaining strict risk control.
The model operates primarily on the 5-minute chart, with early confirmation on the 3-minute chart. The Asian Killzone is used to define the initial range, plotting its high and low. Higher-timeframe liquidity from Daily, 4H, and 1H charts is marked in advance to provide directional context. IPDA direction is determined using macro alignment such as global interest rate bias and long-term trend behavior.
Once the Asian session concludes, price is expected to sweep either the high or low of the Asian range or the previous day’s high/low. After the liquidity sweep, the market must show a valid CHoCH, confirming a shift in internal structure. Entries are taken only after the formation and retest of a Balanced Price Range (BPR) created by overlapping imbalances. Trades are executed from these imbalance zones, targeting the next liquidity area, with stop loss placed at the most recent swing high or low.
This model prioritizes precision over frequency, aiming for fewer trades with higher reward-to-risk ratios, typically 1:3 or better, and a strict daily risk cap.
CHECKLIST – STOP HUNT MODEL
1.Mark Asian Killzone High and Low
2.Identify IPDA directional bias for the pair
3.Mark Buy-side and Sell-side liquidity from Daily, 4H, and 1H
4.Wait for a liquidity sweep (Asian High/Low or Previous Day High/Low)
5.Confirm a valid CHoCH
6.Identify a valid BPR (overlapping imbalance)
7.Enter trade from the BPR zone
8.Target the next liquidity pool
9.Place stop loss at the last swing high or low
RULES – STOP HUNT MODEL STRATEGY
> Always pre-mark Buy-side and Sell-side liquidity on 1D, 4H, and 1H
> Asian Killzone must complete by 10:30 AM IST
> After Asian close, mark 15-minute timeframe liquidity
> Trade only after the market sweeps the Asian session high or low
> Align trades with IPDA direction:
> Bullish IPDA → Prefer sweep of Asian Low
> Bearish IPDA → Prefer sweep of Asian High
> CHoCH confirmation is mandatory:
> Green CHoCH for bullish setups
> Red CHoCH for bearish setups
Setup conditions:
1. Bullish: CHoCH above price + BPR below price
2. Bearish: CHoCH below price + BPR above price
3.BPR must be formed by overlapping imbalances:
4.Red → Green for bullish
5.Green → Red for bearish
6.Look for V-shaped (bullish) or A-shaped (bearish) candle behavior
7.Entry only on imbalance retest — no chase entries
8.Targets must be killzone extremes or next liquidity zone
9.Stop loss must always be at the last swing high or low
10.No manual exits if aiming for 1:3 RR
11.If price sweeps both sides or no clean sweep occurs → No Trade
12.Trade less, execute cleaner setups
13.Daily target: 1% maximum


